

| << Chapter < Page | Chapter >> Page > |
This module describes how to create a Code Composer Studio (CCS) project that executes a simple C program. The project does not use DSP/BIOS and runs on the CCS simulator. The code will be a simple "hello world" program. In this project the processor used is the TMS320C67xx but the process works for other processors as well.
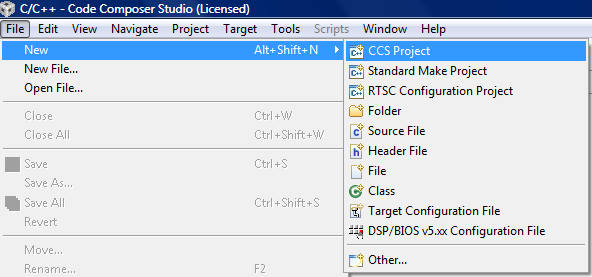
To create a CCS project select File->New->CCS Project .
This will bring up a window where you can enter the name of the project. The location selected is the default location for project files. Press Next .

Since the example uses the TMS320C67xx processor the project type selected is C6000 . The project configurations are Debug and Release . Select the Next button.

If there are any project dependencies they are selected on the next screen. Select the Next button.

On the Project Settings Screen , select the items that pertain to the type of project to be created. Since the project will be executed select Output Type: Executable . The processor type is TMS320C67xx so the Device Variant is Generic C67xx Device . This project will use Little Endian . The code generation tools are the latest version (in this case TI v7.0.3). The runtime support library is selected to match the device variant and the endianness selected. The library can be selected automatically. Press Next .

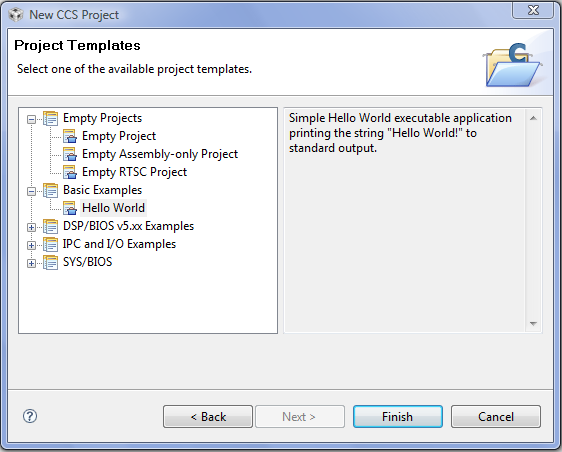
Since this project will be a simple C program project, select either the Empty Project or the Hello World example.
After the projects settings have been set, select Finish and the project will show up in the C/C++ Projects view.

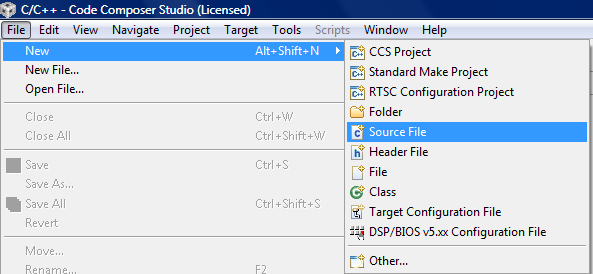
Projects in CCS must have a
main function. This function gets executed first by default. So create a program file that contains a
main function. Select
File->New->Source File .
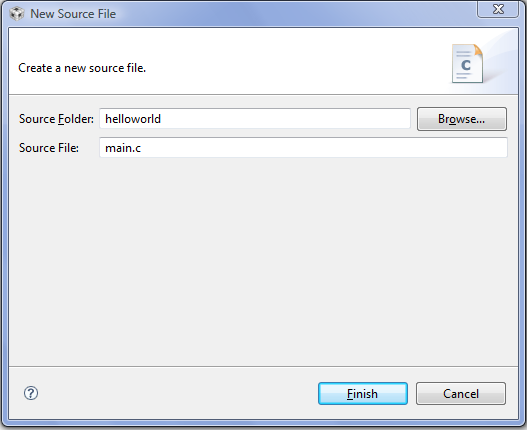
The New Source File dialog opens and you can enter the source file name. Add a .c extension for a C program file. The source folder should be the folder of your project. Select Finish and a new file is opened.
Enter the C code. The file must contain a main function. After entering the code, save the file.

In order to build and run your project you need to have a target configuration. This file will contain information about the emulator that will be used and the target processor. In this module the target configuration will be the TI simulator for the C6713 processor.
First select File->New->Target Configuration File .

In the New Target Configuration dialog enter the configuration file name ending in the .ccxml file extension. Put the file in the project directory. Select Finish and a new target configuration file opens.

In the configuration, select the connection needed (simulator or some type of emulator, etc.) and the type of device. In this example the TI simulator is used with the C6713 little endian simulator device. Select Save when done.

Now the target configuration is in the project.

The default project settings do not have the stack and heap sizes defined. This will produce warnings when building the project. To change the project properties, select Project->Properties and then click on C/C++ Build on the left and the C6000 Linker/Basic Options under Tool Settings . For the stack size and heap size enter 0x400 and click OK .

To start a debug session either select Target->Debug Active Project or press the debug icon in the menu bar.

When the debug session starts the code files are compiled and linked into an executable file and the file is loaded onto the target. The initialization code is executed and the program is halted at the beginning of the
main function.

Icons on the debug window can be used to run the program and other debugging tools.

Press the green arrow to run the program. The
main function will be executed and the program will leave the
main function. In the program the printf function prints to the console which if not shown by default can be viewed by selecting
View->Console . In the console is shown the "hello world" that was printed.

Notification Switch
Would you like to follow the 'Dsp lab with ti c6x dsp and c6713 dsk' conversation and receive update notifications?

|
|

|
|

|
|

|
|

|
|

|
|

|
|

|
|

|
|

|