

| << Chapter < Page | Chapter >> Page > |
For example, Figure 5 shows the results of dragging two Label controls, one HSlider control, and one Image control from the Components tab of Figure 4 to the Design tab of Figure 5. (No attempt has been made to set property values on any of the controls shown in Figure 5.) .
XML code before setting properties
If you select the Source tab at this point, you will see the XML code shown in Listing 1.
<?xml version="1.0" encoding="utf-8"?><mx:Application xmlns:mx="http://www.adobe.com/2006/mxml"><mx:Label text="Label"/><mx:Label text="Label"/><mx:HSlider/><mx:Image/></mx:Application> Compile and run
As you can see, the XML code in Listing 1 is pretty sparse. You could compile and run the application at this point. All you would see would betwo labels each containing the text Label and a slider covering the default numeric range from 0 to 10.
Put some meat on the bones
We will need to put some meat on the bones of this skeleton mxml code in order to create our Flex application. We can accomplish that by settingattribute values that correspond to properties of the controls.
Setting attribute values
Once again, we have three choices:
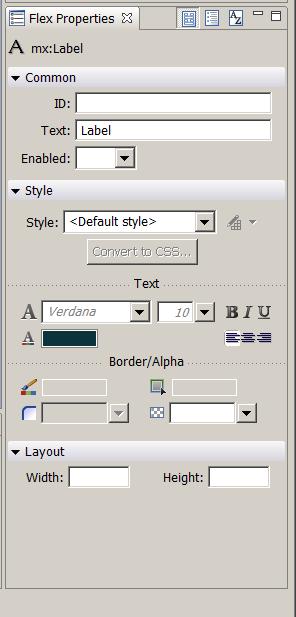
The Flex Properties tab
When you select the Design tab shown in Figure 5, the Flex Properties tab shown in Figure 6 appears in the bottom-right of the IDE.
The appearance of the Flex Properties tab depends on which component is selected in the Design tab. Figure 5 shows one of the Label controls selected, and Figure 6 shows the Flex Properties tab corresponding to a Label control.
You will see a very similar properties tab if you create a new Flash Builder 4 project and specify use of the Flex 3 compiler. Some of theitems are in different locations than Figure 6 but it appears that the Flash Builder 4 properties tab has the same items for a Flex 3 project.
A variety of user input controls
The Flex Properties tab contains a variety of user input controls that allow you to specify values for many of the commonly used properties that areallowed for the selected component.
Note, however, that the documentation for the Label control lists many properties that are not supported by the Flex Properties tab shown in Figure 6. You can increase the number of properties shown in the tab byselecting one of the controls at the top of the tab that converts the display into an alphabetical list of properties. However, even this doesn't seemto show all of the properties defined by and inherited by some components.
If you need to set properties that are not supported by the Flex Properties tab, you probably have no choice but to select the Source tab shown in Figure 5 and write mxml code for those properties.
Notification Switch
Would you like to follow the 'Introduction to xml' conversation and receive update notifications?

|
|

|
|

|
|

|
|

|
|

|
|
|
|
|

|
|
|
|

|