

| << Chapter < Page | Chapter >> Page > |
All files referenced and other helpful information is posted on this site at the GitHub link. The GitHub link also has 3 Python files, which is our completed OCR software. This tutorial serves as a walkthrough of the code under recognitionScript.py, where more in-depth explanations are discussed in the provided .py files.
This tutorial uses Python 2.7, Numpy, and OpenCV for the software development portions. The instructions for downloading OpenCV for Linux can be found at this link. For windows, go to to opencv.org For Numpy, visit numpy.org For Python, visit python.org
We assume the reader will have been exposed to Python before. If not, a general understanding of Python IO and the ability to look up Python documentation is preferable.
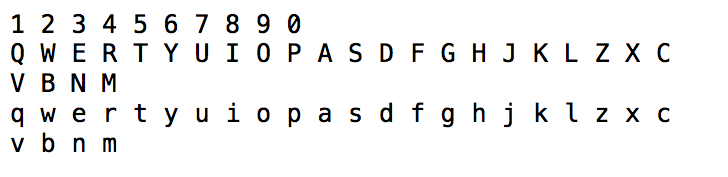
For our tutorial, we will make a few assumptions for our input images. First off, the image will only have printed text. We also assume the image will be a png. For example, we will have pictures similar to the figure below.
 Because this is an introduction, there will not be information on transforming and translating, as this involves verbose algorithms beyond the scope of our knowledge.
Second, images may contain the full range of colors.
The first step is to read in the image we will be performing OCR on. OpenCV has the ability to do this with imread() function. We have made a wrapper function that does this and returns a copy, which will be necessary for some OpenCV functions

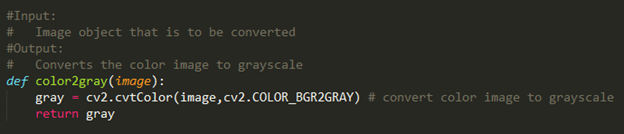
Right now, im is an image, which can be represented as a matrix with pixels. Each pixel is some object with 3 values, red, blue, green(rgb). In order to make this compatible with future functions, we will convert the image to grayscale. This involves a function provided by OpenCV, which process the rgb values and replace the pixel with some intensity value. The next step is to convert the image into grayscale. Open Cv has a color converting function called Cv2.cvtColor(image, code ) which can map one type of color to another based on the input code. For the purposes of converting our image into grayscale we use the parameter Cv2.COLOR_BGR2GRAY and call our the helper function color2gray, which returns the grayscaled image.
 Above is our grayscaled image.
Next, we will need to apply a filter onto the image. Depending on the task, we could use many different filters to achieve a certain goal. We want to filter our image to increase our ability to detect edges; this allows us to identify characters in the image. Therefore, we will be covering the Gaussian, Laplacian, and Sobel filters.
![]()
The Gaussian filter is effective towards noisy signals, because of its characteristic as also being a low pass filter. By blurring the image to a small degree, we allow any sensitive edge detection algorithms to not mistake noise to be something of significance.
Notification Switch
Would you like to follow the 'Elec 301 projects fall 2014' conversation and receive update notifications?

|
|

|
|

|
|

|
|

|
|

|
|
|
|

|
|

|
|

|