

| << Chapter < Page | Chapter >> Page > |
If you have worked through the Scratch tutorials, you will recognize that the material in the lower-left panel is always associated with one of the following eighttoolbox buttons in the upper-left panel:
In other words, when you click on one of the buttons in the upper-left panel, it exposes a set of tools that you can use to write your program. Those toolsappear in the lower-left panel.
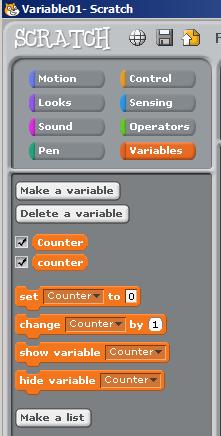
When one of those eight buttons is clicked, it becomes completely colored and the tools associated with that button are displayed below it. The orangebutton has been selected in Image 1 . Since you can't read the label on that button, I will tell you that the label on the orange button reads Variables .
Image 2 presents a full-size view of the two left-most panels from Image 1 showing the tools that are exposed by the Variables button.
Tools in the Variables toolbox: When you first click the Variables button, only two gray buttons are exposed in the bottom panel of Image 2 . One gray button is labeled Make a variable and the other gray button is labeled Make a list . The orange material in Image 2 was produced by clicking twice on the button labeled Make a variable and entering a name for each variable.
Click here for instructions on creating variables.
Image 2 shows that this Scratch program contains two variables with the following names:
I purposely spelled the names of the two variables the same and made them differ only by the case of the first letter to illustrate that Scratch is casesensitive insofar as the names of the variables is concerned. Even though these two variable names contain the same letters, they are two different variablesbecause one name begins with an upper case "C" and the other name begins with a lower-case "c".
There are four programming blocks (in the bottom panel of Image 2 ) associated with each variable. As you learned from working through the tutorials, you can drag theseblocks into the programming area in the center pane in Image 1 to actually write the program. Thus, there are four different operations that you can perform on a variable:
(You can actually perform the last two operations simply by clicking the block with no requirement to drag it into the center pane. Severaloperations that required double-clicking prior to v1.4 can now be accomplished with a single click.)
Notification Switch
Would you like to follow the 'Teaching beginners to code' conversation and receive update notifications?

|
|

|
|

|
|

|
|

|
|

|
|

|
|

|
|

|
|

|