

| << Chapter < Page | Chapter >> Page > |
TECHNOLOGY
Grade 6
3-D DREAMS
Module 6
Drawing a three-dimensional figure without a grid
You must now learn to draw a three-dimensional figure without a grid. One way is to draw a three-dimensional figure in perspective by making use of disappearing lines of vision on the horizon.
Background:
Lines that are further away from our field of vision, tend to have the following qualities:
It seems as if parallel lines move closer until they meet on the horizon. (Think of the Karoo road.)

Horizontal lines of the same length seem to become shorter the further they are from us.

Objects of the same size look smaller the further away they are from us.

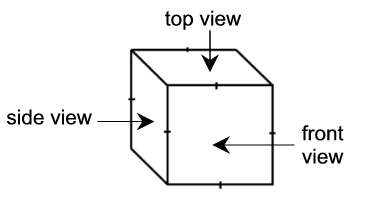
HOW TO DRAW AN ELEMENTARY CUBE IN PERSPECTIVE

Draw a square.
2. Draw a horizontal line above (if you want to see the top) or in the middle (if you want a front view) or under the square (if you want to see the bottom).

3. Mark the vanishing point somewhere on the horizontal line. If it is to the right of the square, you will see the right view; left of the square you will see the left view.

4. Draw faint lines from each outer corner of the square to the vanishing point.

5. Complete the cube by drawing the rear side of the shape. The lines of the sides near the vanishing point are shorter than the actual front sides of the square but they run parallel to the front sides. The sides facing the disappearing point are also shorter.

6. Erase the horizontal line, the vanishing point and the lines facing the vanishing point. Make all the visible lines of the cube darker. Now you have your cube.

ASSIGNMENT 1:
Complete the following cube (30 mm by 30 mm) so that you can see the left view.
[LO 1.12]
Challenge:
Now try to draw it with the vanishing point on the right side of the cube.
Another method is, to make use of the oblique view method at an angle of 45°. (An oblique view is a three-dimensional drawing of which the sightlines are at an angle of 45°).
HOW TO DRAW AN OBLIQUE VIEW CUBE:

1. Draw a square.
2. Draw the side view and top view by drawing a 45° angle at every point (visible outer angle) from the horizontal. (The angles all lie to the left.)

3. Measure the length of a side of the square (front view). Determine the length of the 45° sides by measuring half of the original length.

4. Connect the points to complete the back of the cube. Erase all the unnecessary lines and redraw the lines of the cube with darker lines.
ASSIGNMENT 2:
Draw a cube of which each of the sides on the front view is 40 mm. Also use a protractor or a set square of a 45° angle (oblique view method).
[LO 1.12]
Challenge:
Also try to draw a cube with a 45° angle to the right.
ASSIGNMENT 3A:
Draw a three-dimensional figure of a square according to each of the two above-mentioned methods:
[LO 1.12]
a) with the vanishing point to the right on the horizon;
b) oblique view at 45° using a ruler and protractor (the angles all lie to the right) (breadth: 40 mm).

ASSIGNMENT 3B:
[LO 1.12]
Challenge:
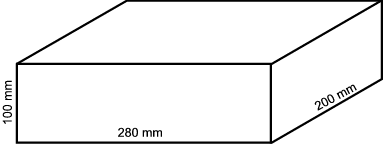
The correct measurements of a shoe box are as follows:
A Length: 280 mm
B Breadth: 200 mm
C Height: 100 mm
Reduce it four times ACCORDING TO SCALE so that you can redraw it in the space below according to the oblique view method.
According to scale: Length:
Breadth:
Height:
Hint:
First draw it as a brick and then adjust it by drawing in the detail of the shoebox. Colour it (according to the example provided) and indicate the actual measurements on it next to each side.
Background:
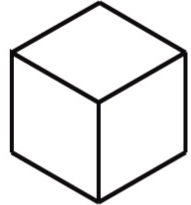
In both of the above-mentioned methods, in order to draw a three-dimensional object, one of the views/planes is turned to the front. With ISOMETRIC drawings, one angle of the figure is turned to face the front.
What is an isometric drawing?
It is a three-dimensional drawing of which the visible lines (the lines that can be seen) are at an angle of 30°.
HOW DO YOU DRAW AN ISOMETRIC CUBE?
1. Draw a broken line in the middle of a given space.

2. Set a point on the line that will indicate the top of the cube.

3. Mark two 30° angles on both sides of the point with the horizontal at the top of the broken line.

4. Draw a vertical side downwards according to the length of one side of the cube.

5. Measure the top two sides to be the same length.
6. Draw a dotted line at the bottom parallel to the top one and measure 30° angles to the top at both sides.

7. Draw these lines so that they are the same length as the vertical side.

8. Draw the two vertical parallel lines on both sides of the centre line.
9. Draw a broken line to connect the two upper angles. Measure 30° at the top from the horizontal on both sides and extend the lines so that they cross. Thus the top view is achieved.
ASSIGNMENT 4:
Draw an isometric cube of which the sides are 50 mm. Use a ruler, pencil and protractor of 30° or a set square.
[LO 1.12]
Challenge:
ASSIGNMENT 5:
Draw a rectangular figure (a wooden block) of which the length is 80 mm, the breadth 30 mm and the height 40 mm.
[LO 1.12]
Remember:
All vertical sides remain vertical, but the oblique lines are 30° from the horizontal.
Assessment
Learning Outcome 1
TECHNOLOGICAL PROCESSES AND SKILLS
The learner will be able to apply technological processes and skills ethically and responsibly using appropriate information and communication technologies
Assessment Standard
We know this when the learner:
1.12 draws appropriate sketches (e.g. labelled two-dimensional drawings of ideas, enhanced drawings of final solutions and drawings showing measurements) to communicate different information appropriately and effectively.
Notification Switch
Would you like to follow the 'Technology grade 6' conversation and receive update notifications?

|
|

|
|

|
|

|
|

|
|

|
|
|
|
|

|
|

|
|

|