Sound Waves - When something vibrates, it makes a sound. The vibrations travel out in all directions from the "something" in the same way that ripples travel out from a pebble that has been dropped in water. But instead of being waves of water, these are waves of vibrations of air:
sound waves . Because it is the air itself that is vibrating, sound waves, unlike water waves, are invisible.
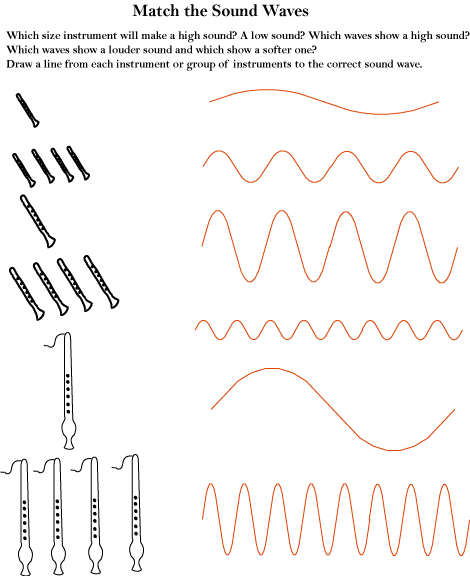
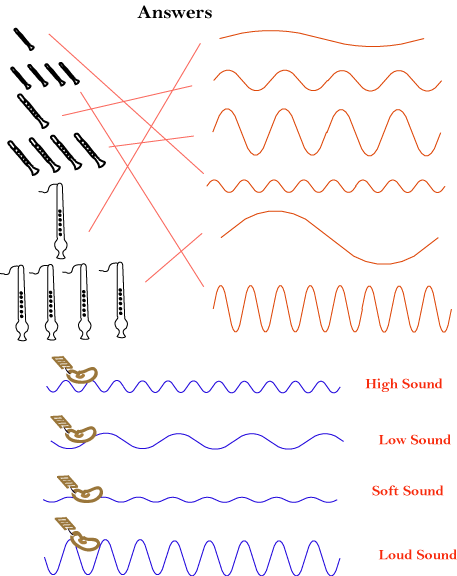
Frequency - or
Pitch - Think of water waves again. They can be close together or far apart. If they are close together, there are more of them; they are more frequent.
Frequency is the term that scientists and engineers use to describe how many pulses of a sound wave arrive at your ear in one second. Musicians use the term
pitch . A sound with a higher frequency (more waves) has a higher pitch, and sounds higher.
Amplitude - or
Dynamic Level - Water waves can also be great, big, tall waves, or small ripples. The size of a wave is called its
amplitude . In sound waves, the bigger the wave, the louder the sound is. Musicians call the loudness of a sound its
dynamic level .
Strings activity
Objectives and assessment
Objectives - The student will construct a simplified version of a stringed instrument, using rubber bands as strings, and will use the instrument to explore the effects of various string characteristics on frequency and amplitude.
Evaluation - Assess student learning using worksheets or answers to discussion questions.
Materials and preparation
Most students will be able to do this experiment alone or in small groups. If you do not want students working with thumbtacks, plan to use boxes or pans as instrument bodies.
You will need lots of rubber bands, as many different lengths and thicknesses and tightnesses as you can find. If you are using boxes, the rubber bands must be long enough to stretch around a box.
You will also need either small, sturdy cardboard or plastic boxes or containers, with or without lids, OR pieces (about 8" X 10" or so) of thick, flat cardboard, OR square or rectangular baking pans, one for each student or group.
If you are using flat cardboard, you will also need thumbtacks or push pins.
If you are using a lidded box, pencils, pens, or other objects approximately the size and shape of a pencil (a couple for each instrument) will be useful.
You may want scissors that are strong enough to cut the cardboard or plastic.
If a stringed-instrument player is available for a show-and-tell, you may want to include this after the activity, to demonstrate and reinforce some of the main points. Any stringed instrument (guitar, violin, harp, etc.) will do.
For older or more independent students, you may want to make copies of the
discussion questions.
Procedure
Each student or group should choose a variety of rubber bands (3-6, depending on the size of their "instruments") to start with.
If you are using flat cardboard, stretch each rubber band between two thumbtacks so that it is tight enough to give a particular pitch.
If using a box or baking pan, stretch the rubber bands around the box or pan.
Have the students pluck each rubber band separately and listen carefully to the "twang". They are listening for which ones sound higher and which sound lower.
To try many different thicknesses and tightnesses, students can trade rubber bands with each other or trade off from the central pile if there are enough.
Students with the thumbtack instruments can vary length and tightness by changing the distance between the thumbtacks.
Students with box or pan instruments can vary tightness by pulling on the rubber band at the side of the box while plucking it at the top. Students with lidded box instruments can vary length by slipping a pencil under each end of the rubber bands on the top of the box and then varying the distance between the pencils, or even holding the rubber band down tightly with a finger between the pencils, in the same way as a real string player.
Students with box instruments can also see if the body of the instrument makes any difference to the sound. Can they play the instrument with the lid off and with it on? Does cutting a hole in the lid change the sound? Does it make it easier to play? Does adding the pencils change the sound or make it easier to play? Do different boxes make a different sound with the same rubber bands? Do cardboard boxes sound different from plastic ones?
Ask younger students the discussion questions while they are experimenting. Allow them to check and answer immediately. Summarize the answers for them on the board, or remind them and let them write them down when they are done experimenting. Give older students a list of the discussion questions before they begin.
Receive real-time job alerts and never miss the right job again
Source:
OpenStax, Noisy learning: loud but fun music education activities. OpenStax CNX. May 17, 2007 Download for free at http://cnx.org/content/col10222/1.7
Google Play and the Google Play logo are trademarks of Google Inc.
Notification Switch
Would you like to follow the 'Noisy learning: loud but fun music education activities' conversation and receive update notifications?