

| << Chapter < Page | Chapter >> Page > |
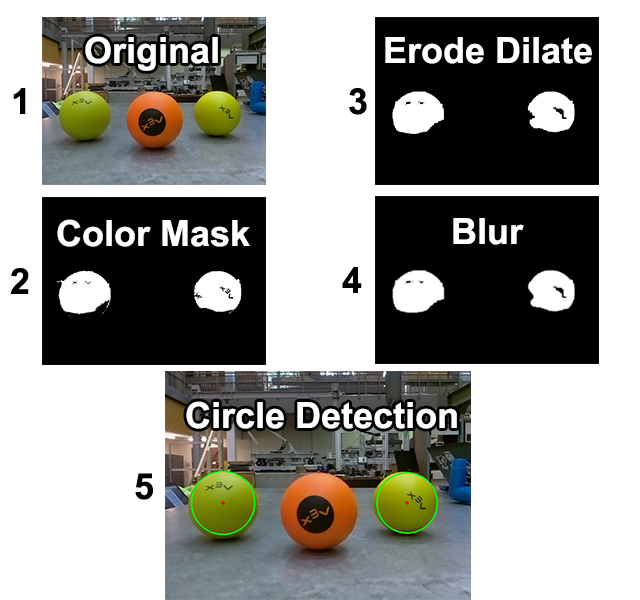
After masking for the yellow balls, we need to filter out any noise so that the circle detector doesn't detect any false balls. We first erode, then dilate the image to get rid of most extraneous noise. This is followed by a simple Gaussian blur to help the circle detector even further.
Circle detection is done using OpenCV. We could have used the circle detector that we wrote ourselves, but it runs much slower than the one provided in OpenCV. The function
cv2.HoughCircles(dp,minDist,param1,param2,minRadius,maxRadius)
has 6 parameters that we can adjust. The dp argument corresponds to the resolution of the accumulator threshold as a simple inverse ratio between the image resolution and the accumulator resolution. The minDist argument is the minimum distance allowed between two detected circles. param1 is the threshold to be used for the Canny edge detector which is built into the function. param2 corresponds to the accumulator threshold. The smaller param2 is, the more false circles may be detected. Finally minRadius and maxRadius are the smallest and largest balls that are allowed to be detected.
Yellow ball detection
Once circles are detected, the system must output an angle over UART. In this instance, there are two cases:
Once data is sent over UART, the next image is captured on the Raspberry Pi. At our chosen resolution, we can send data 5 times per second. It is then up to the Vex Cortex to drive the motors.
Finally, we will take a look at the robot itself, and how it uses the UART input in order to track and approach the ball.
The robot's vision function is a state machine with 3 states, as described below. Note that State 2 is managed by a PID control structure, using the gyroscope's current value as the input, and a setpoint of the gyroscope's value plus the angle delivered from the Raspberry Pi.
void vision() {
	gyroReset(gyro->g);
	gyroPid->running = 1;
	int targetAngle = gyro->value;		//UART angle goeth here.
	int seesBall = 0;			//UART ball in sightint turnPow = 20;
	int drivePow = 30;for(ever) {
		if(joystickGetDigital(1, 8, JOY_UP)) operatorControl();char* sInput = fgets(uartIn, 6, uart1);
		if(sInput) {//Decode UART input
			char* sAngle = strtok(sInput, " ");char* sBalls = strtok(NULL, " ");
			seesBall = atoi(sBalls);if(seesBall)
				targetAngle = gyro->value + atoi(sAngle);
		}gyroPid->setPoint = targetAngle;
		turnPow = seesBall ? gyroPid->output : 0;
		printf("Gyro: %d/%d, atSetpoint: %d, output: %d\n\r", gyro->value, gyroPid->setPoint, gyroPid->atSetpoint, gyroPid->output);
		if(!gyroPid->atSetpoint) {
			MOTDTFrontLeft->out = -turnPow;
			MOTDTFrontRight->out = turnPow;
			MOTDTBackLeft->out = -turnPow;
			MOTDTBackRight->out = turnPow;
		}else if(seesBall){
			MOTDTFrontLeft->out = drivePow;
			MOTDTFrontRight->out = drivePow;
			MOTDTBackLeft->out = drivePow;
			MOTDTBackRight->out = drivePow;
		}if(!seesBall) {
			targetAngle = gyro->value;
		}delay(20);
	}}
This code uses a custom library written by the Rice Robotics Club in order to handle output to the motors, and the PID control. The source for this library can be found in
Section 4.2 Additional Resources
Notification Switch
Would you like to follow the 'Hough transform object detection' conversation and receive update notifications?

|
|

|
|

|
|

|
|
|
|
|

|
|

|
|

|
|

|
|

|