

| << Chapter < Page | Chapter >> Page > |
In this lab, you will create an Android application that plots the spectrogram of streaming audio, and deploy it on the Google Nexus 7 tablet.
Similar to the previous labs, you will be provided with an existing project with all of the required peripherals already set up. Unlike the previous labs where data was processed sample-by-sample, this lab requires block-based processing.
What is the minimum latency for processing a block of length 256, with an audio sampling rate of 8 kHz?
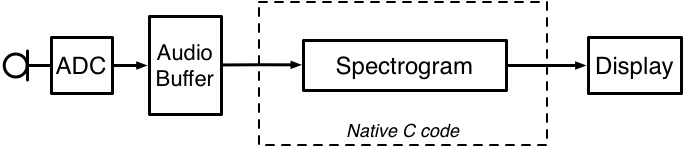
[link] shows a block diagram of the system you will be implementing. The project is already configured to stream audio and display the processed output to the screen.
System-level block diagram
You will be focusing on the signal processing tasks, which will be implemented in native C code. For those that are interested in the Android Java specifics, we will provide an optional tutorial that shows you how to build the project from scratch, explains the different Android classes that were used, and along the way, provides supplemental links to references and other useful Android tutorials available on the web.
In this section, you first setup your Android device in development mode, import a skeleton project into Eclipse, and familiarize yourself with the Android project structure and build process.
On the tablet, you must enable the
Developer options under
Settings :
Settings ,About tablet ,Build number seven times (yes, 7).Under
Settings>Developer options , enable the
Stay awake and
USB debugging options.
The development environment you will be using is the Nvidia Tegra Android Development Pack 2.0 . To get started:
C:\NvPack\cygwin\cygwin.bat cd /cygdrive/c/NvPack/eclipse ./eclipse Choose a new workspace on your
U: drive, similar to what you did in Lab 0. This step feels familiar because CCS is actually based on the Eclipse framework.
Once Eclipse opens, select
File>Import...
Once the project is imported, it will try to build automatically. If you see a build error, you will need to define the $NDKROOT variable in your workspace:
Project>Properties C/C++ Build>Environment Add... Name: NDKROOT,
Value: C:\NvPack\android-ndk-r8An Android project with Native code support has 4 main components:
.\AndroidManifest.xml - contains app-related information, such as project name, activities, and required peripherals (e.g., microphone)..\res\layout\main.xml - describes the layout of the user interface. In our project, we define an
ImageView , which is used to display the spectrogram..\src\ - contains the Java source files..\jni\ - contains the native C source and Make files.Notification Switch
Would you like to follow the 'Ece 420 fall 2013' conversation and receive update notifications?

|
|

|
|

|
|
|
|
|

|
|
|
|
|

|
|

|
|
|
|
|

|