The Rice Air Curriculum involves students in air pollution and meteorology measurements using protocols developed by the GLOBE Program (Global Learning and Observations to Benefit the Environment). The GLOBE protocols used are—cloud cover, humidity, surface and air temperature, wind direction, and surface ozone. The notes below are summarized from the full GLOBE protocols available online at www.globe.gov.
Setting up a measurement station:
It is very important that a measurement station is set up. The station should be set up in an open area (at least 30 feet from the nearest building). Set up a bench or table that is about 1 meter off the ground where the measurement tools can be placed. The instruments placed on the table should not be exposed to direct sunlight.
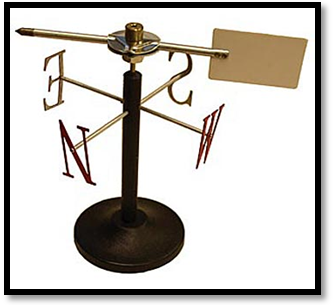
Wind Vane:
Assemble the wind vane by placing the pointer on the vane.
Place the wind vane on the table or bench. (If it is possible, set up the wind vane in an even higher place to get a more accurate measurement of the true wind direction.)
Use a compass the find magnetic North and align the base of the wind vane to match true North.
Students can now read the direction of the wind. (Since the end of the pointer with the larger area is blown away from the wind direction, the pointer will point towards the direction of wind i.e. if the sharp end points toward the wind, the wind is coming from the north).
Cloud Charts:
The cloud chart kit includes several activities that you may do with your students in order to familiarize them with different types of clouds. Please pick one activity to do with them before they start taking measurements in Lesson 2.
Please hang up the cloud chart in the classroom so that students may look at it for reference when they write down what types of clouds they see in the sky during each measurement that they take.
Digital Hygrometer/Thermometer:
Place the instrument on the table when students go outside to set up the ozone strip.
Record the current temperature and the relative humidity.
When students go back outside to scan the ozone strip, record the current temperature and the relative humidity.
Return the instrument to the classroom and store in a dry place.
This instrument can be damaged by condensation. So, if it is wet outside, record 100% relative humidity as an approximation and do not use the instrument that day.
Infrared Thermometer (IRT):
Wrap the IRT in the thermal glove provided or place it outside 30 minutes before taking measurements (so it can adjust to the outside temperature). [Note: The thermal glove is an oven mitt, cut to provide an opening for the front of the thermometer]
Point the IRT at the surface students want to measure the temperature of and pull the trigger. The temperature will pop up on the display – record this value.
Have students choose three places they would like to take the surface temperature of and record these temperatures. Some recommendations are a grassy area or a concrete area. Students may hypothesize about what surfaces have lower or higher temperatures compared to each other, and how this might relate the amount of surface ozone measured. Students will use this data along with other measurements during Lesson 7.
Students must take these three temperature measurements both when the ozone strip is exposed and when it is read.
Zikua Ozone Scanner and Ozone Strips:
The ozone strips (Eco-Badge Test Cards) are chemically sensitive strips that change color in the presence of ozone.
The Zikua Ozone Scanner is an optical reader designed to measure the concentration level of surface ozone after an ozone strip has been exposed for one hour. The ozone scanner consists of
an LCD display on the face of the unit
a sliding on/off switch, top right on the unit face
two command buttons on the top of the unit: the left button is used for scrolling, the right for selecting values
a slot on the left side of the unit which accepts your Eco Badge Test Card
a screen brightness adjustment screw located on the back of the unit to adjust the LCD display screen
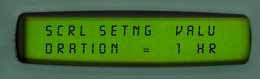
Before use, duration and measurement settings must be chosen:
Press the left button until the LCD shows the Settings command:
Press the right button to specify the Settings command. Press the right button repeatedly to scroll through duration options. You want to choose 1 HOUR.
When the test duration you want to use is displayed, press the left button. Press the right button repeatedly to scroll through measurement options. Select PPB (Parts per billion).
The Zikua then must be calibrated:
Calibrating the Zikua uses an unexposed Test Card for a reading to establish a baseline standard for reading exposed Test Cards. This is important and should be performed each time you begin a new series of Zikua readings and then every fifteen to twenty tests.
Select the calibration command. From the Settings display, scroll through the command options (by pressing the left button repeatedly) until the following display appears:
Press the right button. The LCD shows:
Insert an unexposed one hour Test Card, printed side up, into Zikua’s Test Card slot. A number appears in the lower right side of the LCD.
Press the left and right buttons at the same time to save your calibration. Remove the unexposed Test Card from the slot. The number 171 (a range of 168 to 174 is acceptable) will now appear in the lower right hand corner of the display.
Now, the Zikua and the Eco-Badge Test Cards are ready to be used:
Please read Teacher Support available on pages 3-4 of the GLOBE Surface Ozone Protocol http://www.globe.gov/tctg/ozone.pdf?sectionId=15&rg=n&lang=EN. This discusses the logistics of placing the test card in the measurement station and then reading it, and also the general care and use of the Zikua Ozone Scanner.
Once the Test Card has been exposed for one hour, the Zikua can be used to read it:
Insert the exposed Test Card with the printed side facing up into the Test Card slot.
Zikua reads the card and displays its reading in the lower right of the LCD.
It is important to read the handheld scanner in a shaded area with the scanner placed on a level, stable surface. The scanner should be outside for at least five minutes before it is used so that it can adjust to outside conditions.