Learn how to add commands to a MIDlet and how those commands are presented to the user in the Sun cell phone emulator. Also learn how to produce interactive behavior in a MIDlet through the use of a CommandListener object and an ItemCommandListener object.
Published: June 17, 2008
By Richard G. Baldwin
Java Programming Notes # 2586
This is one in a series of tutorial lessons designed to teach you how to write programs using the Sun Java Wireless Toolkit for CLDC. The first lesson was titled Getting Started with MIDlets and the Sun Java Wireless Toolkit for CLDC. The previous lesson was titled Using Forms and Items in MIDlets (see Resources).
What you will learn
I will begin by illustrating and explaining the addition of Command objects to a MIDlet and showing you how those commands are presented to the user in the Sun cell phone emulator.
Interactive behavior of a MIDlet is achieved, not through commands, but rather through the use of a CommandListener object or an ItemCommandListener object. I will illustrate and explain the setting and subsequent processing of a CommandListener in one of the simplest ways possible.
Following that, I will present and explain a much more substantive MIDlet. This MIDlet illustrates the use of CommandListener objects to handle seven of the eight possible types of commands and shows how to use commands to navigate through the different pages of a MIDlet that is composed of several pages.
Finally, I will illustrate and explain the use of an ItemCommandListener to handle an ITEM command on an item contained in a Form.
I recommend that you open another copy of this document in a separate browser window and use the following links to easily find and view the figures and listings while you are reading about them.
I recommend that you also study the other lessons in my extensive collection of online Java tutorials. You will find a consolidated index at www.DickBaldwin.com.
If you were expecting the interactive programming capability of J2ME to be similar to the JavaBeans or Delegation Event models in J2SE (see Resources), you are in for a big disappointment. The model is more akin to the somewhat rudimentary models that I describe in the following tutorial lessons
Partial class hierarchy for MIDP 2.0
A partial class hierarchy for MIDP 2.0 is shown in Figure 1.
Figure 1. Partial class hierarchy for MIDP 2.0.
|
I have discussed and illustrated the classes shown in boldface Italics (plus the Choice interface) in earlier lessons (see Resources). I will discuss and illustrate the following class and interfaces in this lesson:
I will discuss and illustrate the Canvas and GameCanvas classes in future lessons. I will leave CustomItem as an exercise for the student.
I will present and explain four MIDlets in this lesson. The first MIDlet named Command02 illustrates the addition of commands to a MIDlet and shows how those commands are presented to the user.
Interactive behavior of a MIDlet is achieved, not through commands, but rather through the use of a CommandListener or an ItemCommandListener. The MIDlet named Command03 illustrates the setting and subsequent processing of a CommandListener in one of the simplest ways possible.
The MIDlet named Command04 is a much more substantive program. It illustrates the use of CommandListener objects to handle seven of the eight possible types of commands. This MIDlet shows how to use commands to navigate through the different pages of a MIDlet that is composed of several pages.
The MIDlet named Command05 illustrates the use of an ItemCommandListener to handle an ITEM command on an item contained in a Form.
According to Sun,
"The Command class is a construct that encapsulates the semantic information of an action. The behavior that the command activates is not encapsulated in this object. This means that command contains only information about "command" not the actual action that happens when command is activated."
What does this really mean?
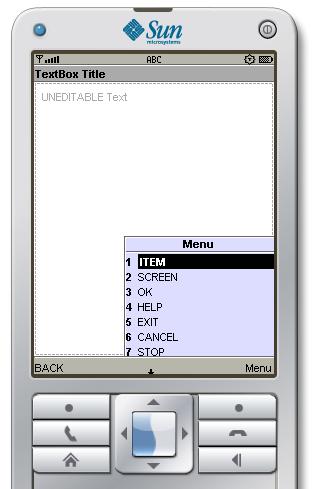
Perhaps the image of the Sun cell phone emulator shown in Figure 2 will help.
Figure 2. Sun cell phone emulator with nine commands showing.
|
|
Commands on the Sun cell phone emulator
Figure 2 shows an image of the Sun cell phone emulator with nine commands showing. One of the commands (Menu on the right soft key) was produced by the AMS. The BACK command on the left soft key as well as the seven commands showing in the Menu were produced by the MIDlet. (I will present and explain the code that produced this image later in this lesson.)
A CommandListener is required
When the user uses the keys on the cell phone keypad to activate one of the commands, the user normally expects the MIDlet to take some action that is semantically consistent with the command label.
Seven of the commands shown in Figure 2 were added to the TextBox component containing the text that is displayed at the top of Figure 2. However, if you were to run this MIDlet and activate one of those seven commands, nothing significant would happen. This is because a CommandListener was not registered on the TextBox to provide a specific action for each of the different commands.
Behavior is not encapsulated in the Command object
The behavior of the commands is not encapsulated in the Command objects that are associated with the Displayable object (a TextBox in this case). Rather, the behavior of all of the commands is encapsulated in a single CommandListener object that is associated with the Displayable object.
One way to think of this is that the Command objects simply display the commands on the screen, but it is the CommandListener object that performs the action when the user activates one of the commands.
There are two overloaded constructors for the Command class in MIDP 2.0. One of those constructors requires the following parameters:
The other constructor eliminates the longLabel, thus requiring only three parameters.
The purpose of the parameters
Here is part of what Sun has to say about the four constructor parameters:
"A command contains four pieces of information: a short label, an optional long label, a type, and a priority. One of the labels is used for the visual representation of the command, whereas the type and the priority indicate the semantics of the command."
The shortLabel parameter
With the following exception, the shortLabel parameter results in the command label that appears on the cell phone emulator screen in Figure 2.
Sun tells us:
For command types other than SCREEN, the labels provided may be overridden by a system-specific label that is more appropriate for this command on this device. The contents of the label strings are otherwise not interpreted by the implementation."
I believe this means that for some devices, the command label specified by the programmer may not be the actual command label that is displayed by the device. However, that doesn't seem to be the case for the Sun cell phone emulator. The command label displayed by the emulator seems to match the shortLabel provided by the programmer.
The commandType parameter
As the name implies, the commandType suggests something about the intended behavior of the command. There are eight allowable command types. These eight command types are shown in Figure 2 (not including the Menu command). A major purpose of this lesson is to illustrate and help you to understand the intended purpose of the different command types.
The priority parameter
The purpose of the priority parameter is somewhat controversial. Here is part of what Sun has to say about the command priority:
"The application uses the priority value to describe the importance of this command relative to other commands on the same screen. Priority values are integers, where a lower number indicates greater importance. The actual values are chosen by the application. A priority value of one might indicate the most important command, priority values of two, three, four, and so on indicate commands of lesser importance.
Typically, the implementation first chooses the placement of a command based on the type of command and then places similar commands based on a priority order. This could mean that the command with the highest priority is placed so that user can trigger it directly and that commands with lower priority are placed on a menu. It is not an error for there to be commands on the same screen with the same priorities and types. If this occurs, the implementation will choose the order in which they are presented."
A somewhat opposing view
Vikram Goyal (see Resources) would have us believe that the priority value determines how the commands are placed on the screen. He states:
"By specifying a priority, you tell the AMS running the MIDlet where and how to show the command. A lower value for the priority is of higher importance, and therefore indicates a command that the user should be able to invoke directly. For example, you would probably always have an exit command visible to the user and give it a priority of 1. Since the screen space is limited, the device then bundles less-important commands into a menu."
A view from the other extreme
The book Wireless J2ME Platform Programming By Vartan Piroumian tells us:
"Finally, a few words should be said about command priority. Note that the organization of commands -- that is, placement according to their type, is very different from prioritization of event delivery. The placement scheme has nothing to do with the Command priority attribute, one of the three attributes of Command objects. The command priority dictates the priority that the implementation gives to commands when ordering their delivery to the listener."
Two extreme views plus the middle ground
These three quotations pretty well cover the waterfront relative to the relationship between the value of the command priority and the placement of the command on the cell phone screen. Goyal and Piroumian are at the extreme ends with Sun being somewhere in the middle.
Experimental results with the Sun cell phone emulator
My experimental results with the Sun cell phone emulator seem to agree with Piroumian insofar as placement of the commands is concerned. I have been unable to demonstrate that the value of command priority has any relationship to the placement of commands on the cell phone emulator screen. In fact, as you will see later, the placement seems to defy the command priority, or at least to ignore the priority completely.
|
The purpose of this MIDlet is to illustrate the addition of commands to user interface components. When run on the Sun cell phone emulator, this MIDlet produces the output shown in Figure 2.
One of each of the allowable Command types is added to a TextBox object. No command listener is registered on the TextBox, so activating a command has no effect on the behavior of the MIDlet.
By using comment indicators to enable and disable commands, it is possible to determine the manner in which the Sun cell phone emulator allocates certain commands to the left soft key, the right soft key, and a command menu. Experimental results in this regard will be provided later.
The MIDlet displays a TextBox and allows the user 100seconds to experiment with it. Then the MIDlet enters the destroyed state.
Will discuss in fragments
A complete listing of this MIDlet is provided in Listing 16 near the end of the lesson. I will discuss and explain the MIDlet code in fragments.
Listing 1 shows the beginning of the class and the beginning of the constructor for the class.
Listing 1. Beginning of MIDlet class named Command02.
public class Command02 extends MIDlet{

  TextBox textBox;
  //----------------------------------------------------//

  public Command02(){//constructor
    System.out.println("Construct MIDlet");

    System.out.println("Create TextBox");
    textBox = new TextBox("TextBox Title",
                          "UNEDITABLE Text",
                          40,
                          TextField.UNEDITABLE);
|
The constructor in Listing 1 instantiates and saves a reference to a new object of type TextBox. You have seen this before in an earlier lesson, so this shouldn't be new to you.
The allowable commands
The allowable commands are:
Much of the following discussion is based on experimental results and not on Sun documentation.
Physical placement of the commands
Apparently the Sun cell phone emulator will only place the following four commands on the left soft key with the remaining commands being placed either on the right soft key if there is only one command, or in a command menu if there is more than one command.
Add four commands to the TextBox
The four statements in Listing 2 add the commands indicated to the TextBox.
Listing 2. Add four commands to the TextBox.
    textBox.addCommand(new Command("BACK",
                                    Command.BACK,3));
    textBox.addCommand(new Command("EXIT",
                                    Command.EXIT,2));
    textBox.addCommand(new Command("CANCEL",
                                   Command.CANCEL,3));
    textBox.addCommand(new Command("STOP",
                                   Command.STOP,1));
|
Each of the four statements in Listing 2 calls the Command class constructor to instantiate one of the four commands in the above list. A reference to the Command object is passed to the addCommand method of the TextBox class to associate the command with the TextBox object.
Similar to adding a JButton to a JFrame
Adding a Command object to a Displayable object (such as a TextBox) is somewhat akin to adding a JButton to a JFrame in J2SE. Like the JButton, the command becomes visible but has no distinct behavior associated with it.
Associating behavior with a JButton
In J2SE, there are at least two ways to associate behavior with a JButton:
Associating behavior with a Command
As you will see later in this lesson, in order to associate behavior with a command, we must call the setCommandListener method on the associated Displayable object, passing a reference to an object instantiated from a class that implements one of the following two interfaces:
We will cover that topic in some detail later. The MIDlet currently under discussion doesn't associate any specific behavior with the commands. Rather, this MIDlet simply illustrates how to add commands to a Displayable object and how those commands are placed on the screen by the Sun cell phone emulator.
The preferred order for the left soft key
The order of the commands in the above list matches the order of preference of the Sun cell phone emulator for selecting a command to be placed in the left soft key position (for MIDP 2.0).
For example, if the BACK command is added to the component (as it was in Figure 2), it appears experimentally that it will always be placed in the left soft key with the remaining commands being placed in the command menu shown in Figure 2. (Note that such placement is independent of the order in which the commands are added to the TextBox.)
Location of commands in the command menu
It also appears experimentally that when these commands are relegated to the command menu, they occupy the bottom positions in the menu in the same order that they are listed above.
Remaining commands in the command menu
It appears experimentally that the following four commands are never placed in the left soft key by the Sun cell phone emulator but will always be relegated to a command menu if more than one of them are added to the Displayable object.
Further, it appears experimentally that they will be placed in the menu in the order given above, and that the order in the menu is independent of the order in which they are added to the Displayable object.
Placing one command in each soft key
If there is only one command from the first group and one command from the second group, the command from the first group will be placed in the left soft key and the command from the second group will be placed in the right soft key.
Add four more commands to the TextBox
Listing 3 adds the remaining four commands to the TextBox
Listing 3. Add four more commands to the TextBox.
    textBox.addCommand(new Command("ITEM",
                                   Command.ITEM,3));
    textBox.addCommand(new Command("SCREEN",
                                   Command.SCREEN,3));
    textBox.addCommand(new Command("OK",
                                   Command.OK,3));
    textBox.addCommand(new Command("HELP",
                                   Command.HELP,3));

  }//end constructor
|
Listing 3 also signals the end of the constructor.
Experimenting with the commands
I recommend that you use comment indicators to enable and disable code in Listing 3 and Listing 4 causing different selections from the eight available commands to be added to the TextBox. Also modify the priority values on selected commands. Then run the MIDlet in the Sun cell phone emulator and come up with your own set of ideas as to how the emulator decides upon the placement of the commands.
My interpretation of the experimental results
It appears to me that the placement of the commands by the Sun cell phone emulator:
Remaining code in the MIDlet named Command02
The remaining MIDlet code is shown in Listing 4.
Listing 4. Remaining code in the MIDlet named Command02.
  public void startApp(){

    //Make the TextBox the current display.
    System.out.println("Display textBox");
    Display.getDisplay(this).setCurrent(textBox);

    //Sleep for 100 seconds.
    try{Thread.currentThread().sleep(100000);
    } catch(Exception e){}

    //Enter the destroyed state.
    this.destroyApp(true);
  }//end startApp
  //----------------------------------------------------//

  public void pauseApp(){
  }//end pauseApp
  //----------------------------------------------------//

  public void destroyApp(boolean unconditional){
    System.out.println("Destroy MIDlet");
    notifyDestroyed();
  }//end destroyApp
  //----------------------------------------------------//

}//end class Command02
|
If you have studied the earlier lessons in this series, there should be nothing in Listing 4 that you don't already understand.
As I mentioned earlier, in order to associate some particular behavior with a command, you must call the setCommandListener method on the associated Displayable object, passing a reference to an object instantiated from a class that implements one of the following two interfaces:
That being the case, we need to learn what we can about those interfaces. I will discuss and illustrate the CommandListener interface at this point in the lesson and defer the ItemCommandListener interface until later.
The commandAction method
The CommandListener interface declares the single method shown in Figure 3.
Figure 3. The commandAction method.
| public void commandAction(Command c, Displayable d) - Indicates that a command event has occurred on Displayable d. |
This is the method that will be called when a command that has been added to a Displayable object is activated. There isn't a lot more that can be said about this method, so I will launch right into a simple MIDlet that illustrates its use.
The purpose of this MIDlet is to illustrate the setting and subsequent processing of a CommandListener in one of the simplest MIDlets possible.
An EXIT command and a BACK command are added to a TextBox. A CommandListener is set on the TextBox. When either command is activated, the commandAction method in the listener is called. The incoming command is tested to determine its type. If the type is BACK, the command is simply ignored. If the type is EXIT, the MIDlet enters the destroyed state.
An object of an anonymous class is used to register the CommandListener object on the TextBox object.
Output from the MIDlet
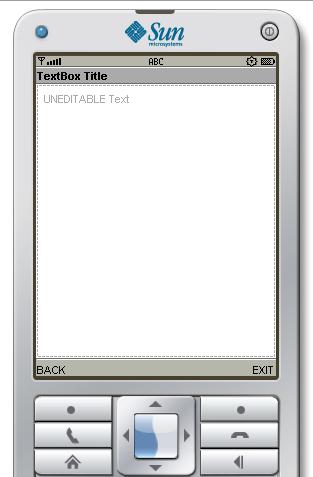
A screen shot of the MIDlet running in the Sun cell phone emulator is shown in Figure 4.
Figure 4. The MIDlet named Command03 in the Sun emulator.
|
|
The most significant thing about Figure 4 is the presence of the BACK and EXIT commands in the lower left and right corners of the cell phone screen.
Will discuss in fragments
I will discuss and explain this MIDlet in fragments. A complete listing of the MIDlet is provided in Listing 17 near the end of the lesson.
The beginning of the class and the beginning of the constructor for the MIDlet named Commond03 is shown in Listing 5.
Listing 5. Beginning of the class for the MIDlet named Commond03.
public class Command03 extends MIDlet{

  TextBox textBox;
  //----------------------------------------------------//

  public Command03(){//constructor
    System.out.println("Construct MIDlet");

    System.out.println("Create TextBox");
    textBox = new TextBox("TextBox Title",
                          "UNEDITABLE Text",
                          40,
                          TextField.UNEDITABLE);
|
By now you should be able to correlate the code in Listing 5 with the display in Figure 4.
Add two commands to the TextBox
The code in Listing 6 adds the BACK command and the EXIT command to the TextBox. You can see those two commands in the two soft key positions in Figure 4.
Listing 6. Add two commands to the TextBox.
    textBox.addCommand(new Command("EXIT",
                                    Command.EXIT,2));
    textBox.addCommand(new Command("BACK",
                                    Command.BACK,2));
|
There is nothing new about the code in Listing 6.
Set a commandListener object on the TextBox
You may find the code in Listing 7 to be a little cryptic and confusing, particularly if you are unaccustomed to the use of anonymous classes in Java. If so, see the tutorial lesson titled The Essence of OOP using Java, Anonymous Classes in Resources.
Listing 7. Set a commandListener object on the TextBox.
    textBox.setCommandListener(
      new CommandListener(){
        public void commandAction(Command cmd,
                                  Displayable disp){
          System.out.println(cmd.getLabel());

          if(cmd.getCommandType() == Command.EXIT){
            //Enter the destroyed state.
            destroyApp(true);
          }else{
            //Ignore the BACK command
          }//end else

        }//end commandAction
      }//end new CommandListener
    );//end setCommandListener

  }//end constructor
|
An anonymous class that implements a known interface
Basically the code in Listing 7 instantiates an object of an anonymous class that implements the CommandListener interface, and passes that object's reference to the method named setCommandListener on the TextBox.
The anonymous class defines the required method named commandAction in order to satisfy the general requirements of implementing Java interfaces.
Much different from JavaBeans event model
Even though this process includes the word Listener, it is radically different from the process of registering a MouseListener object on a JButton in J2SE. The main difference is that the MouseListener interface declares the following five methods:
Each of these methods represents one of the five kinds of mouse events that can occur. When one of the methods is called as the result of a mouse event, you don't have to determine which kind of event it was. The kind of event dictates which method is called.
The commandAction method
On the other hand, the CommandListener interface declares only one method and it is named commandAction. The same method is called regardless of the type of command that was activated. As a result, the same method is called when any of the following eight types of commands are activated:
Must determine the type of command
The code that you write in the commandAction method must first determine which type of command was activated, and then take the particular action that is appropriate for that type of command.
Two types of commands
Only two types of commands were added to the TextBox in this MIDlet: EXIT and BACK. Therefore, it was only necessary to distinguish between the two. However, for the case where all eight of the allowable types of commands are added to a Displayable object, it will be necessary for you to identify the type of command among all eight possibilities whenever the commandAction method is called. In that case, it will probably be simpler to use a switch statement instead of the if-else statement that I used in Listing 7.
MIDlet behavior
In Listing 7, if it is determined that the activated command was an EXIT command, the destroyApp method is called to caused the MIDlet to enter the destroyed state. On the other hand, if the activated command was a BACK command, the command is simply ignored.
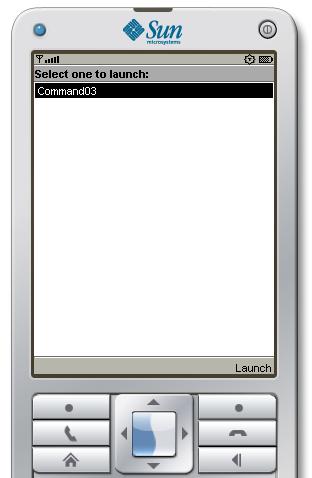
What this means is that if you click the left (BACK) soft key in Figure 4, nothing will happen. However, if you click the right (EXIT) soft key, the MIDlet will terminate, returning the screen to that shown in Figure 5.
Figure 5. Sun emulator screen when the MIDlet is not running.
|
|
Note that the MIDlet named Command03 is available to be launched in Figure 5, but the BACK and EXIT commands have disappeared and have been replaced by a single AMS generated Launch command.
Remaining code for the MIDlet named Command03
The remaining code for the MIDlet is shown in Listing 8.
Listing 8. Remaining code for the MIDlet named Command03.
  public void startApp(){
    //Make the TextBox the current display.
    System.out.println("Display textBox");
    Display.getDisplay(this).setCurrent(textBox);
  }//end startApp
  //----------------------------------------------------//

  public void pauseApp(){
  }//end pauseApp
  //----------------------------------------------------//

  public void destroyApp(boolean unconditional){
    System.out.println("Destroy MIDlet");
    notifyDestroyed();
  }//end destroyApp
  //----------------------------------------------------//

}//end class Command03
|
There is nothing new in Listing 8, so it shouldn't require further explanation.
This is a much more substantive MIDlet. The purpose of this MIDlet is to illustrate the handling of seven of the eight available command types. (The ITEM command is not used in this MIDlet, but will be illustrated later.)
Three "pages" are created using TextBox objects. Commands are added to each page. CommandListener objects make it possible to navigate through the pages and also to handle the HELP, SCREEN, and STOP commands using Alert objects.
General behavior of each command type
The general behavior of each type of command is shown in Figure 6.
Figure 6. General behavior of each command type.
|
Screen shot of the MIDlet in the Sun cell phone emulator
A screen shot of this MIDlet running in the Sun cell phone emulator with page 1 showing is displayed in Figure 7.
Figure 7. Screen shot of Command04 in the Sun cell phone emulator.
|
|
An interesting aspect of Figure 7 has to do with the lack of a BACK command. Because no BACK command was added to page 1, the EXIT command has automatically occupied the preferred position on the bottom left soft key.
Will discuss in fragments
As usual, I will discuss the MIDlet in fragments. A complete listing of the MIDlet is provided in Listing 18 near the end of the lesson.
Listing 9 shows the beginning of the class and the beginning of the constructor.
Listing 9. Beginning of the class for the MIDlet named Command04.
public class Command04 extends MIDlet{

  TextBox page1;
  TextBox page2;
  TextBox page3;
  MIDlet theMIDlet;
  //----------------------------------------------------//

  public Command04(){//constructor
    System.out.println("Construct MIDlet");
    theMIDlet = this;

    //Construct Page 1 and add five commands.
    page1 = new TextBox("Page 1",
                          "Page 1 Text",
                          40,
                          TextField.UNEDITABLE);

    page1.addCommand(new Command("EXIT",Command.EXIT,2));
    page1.addCommand(new Command("STOP",Command.STOP,2));
    page1.addCommand(new Command("SCREEN",
                                 Command.SCREEN,2));
    page1.addCommand(new Command("NEXT",Command.OK,2));
    page1.addCommand(new Command("HELP",Command.HELP,2));
|
Add five commands to the TextBox object
Listing 9 constructs the TextBox for page 1 and adds five commands to the TextBox object. There is no need for BACK and CANCEL commands for page 1, so they are not added to the TextBox.
Four of the five commands are shown in the command menu in Figure 7. The other (EXIT) command is shown on the bottom left soft key.
Very similar code is used to construct and add commands to the TextBox objects for pages 2 and 3. You can view that code in its entirety in Listing 18.
Set (register) a CommandListener on the page 1 TextBox
Listing 10 instantiates an object of an anonymous class that implements the CommandListener interface and passes that object's reference to the setCommandListener method belonging to the TextBox object for page 1.
Listing 10. Set a CommandListener on the page 1 TextBox.
    page1.setCommandListener(
      new CommandListener(){
        public void commandAction(Command cmd,
                                  Displayable disp){
          switch(cmd.getCommandType()){
            case Command.OK:
              //Advance to page2
              Display.getDisplay(theMIDlet).
                                        setCurrent(page2);
              break;
            case Command.HELP:
              Display.getDisplay(theMIDlet).setCurrent(
                  new Alert("HELP",
                  "A short saying often contains much "
                  + "wisdom.",
                  null,
                  AlertType.INFO));
              break;
            case Command.SCREEN:
              Display.getDisplay(theMIDlet).setCurrent(
                  new Alert("SCREEN",
                  "Processing Page 1",
                  null,
                  AlertType.INFO));
              break;
            case Command.EXIT:
              destroyApp(true);
              break;
            case Command.STOP:
              Display.getDisplay(theMIDlet).setCurrent(
                  new Alert("STOP",
                  "Nothing running to be stopped.",
                  null,
                  AlertType.ERROR));
              break;
            default:
              System.out.println("Should never get here");
          }//end switch
        }//end commandAction
      }//end new CommandListener
    );//end setCommandListener
|
Use a switch statement
Fortunately, the different command types are identified by integer values. This makes it possible to use a switch statement (as opposed to an if-else statement) inside the commandAction method to identify and process the different command types.
Three different kinds of actions
There are basically three different kinds of actions taken in Listing 10 depending on the command type:
Once you understand the organization, there is nothing new in Listing 10, so a further explanation shouldn't be necessary.
Similar code for pages 2 and 3
Very similar code is used to set a CommandListener on the TextBox for pages 2 and 3. You can view the code in Listing 18.
For page 2, the same three actions were taken but the number of commands was greater:
For page 3, the actions were:
Remaining code for the MIDlet named Command04
The remaining code for the MIDlet is shown in Listing 11.
Listing 11. Remaining code for the MIDlet named Command04.
  public void startApp(){

    //Make the TextBox the current display.
    Display.getDisplay(theMIDlet).setCurrent(page1);

  }//end startApp
  //----------------------------------------------------//

  public void pauseApp(){
  }//end pauseApp
  //----------------------------------------------------//

  public void destroyApp(boolean unconditional){
    System.out.println("Destroy MIDlet");
    notifyDestroyed();
  }//end destroyApp
  //----------------------------------------------------//

}//end class Command04
|
The most significant thing about the code in Listing 11 is that the startApp method causes page 1 to be showing when the MIDlet enters the active state and starts running.
Here is some of what Sun has to say about the ItemCommandListener interface:
"A listener type for receiving notification of commands that have been invoked on Item objects. An Item can have Commands associated with it. When such a command is invoked, the application is notified by having the commandAction() method called on the ItemCommandListener that had been set on the Item with a call to setItemCommandListener()."
In other words, an ItemCommandListener object is essentially the same as a CommandListener object except that it is used to respond to commands that are activated on objects of type Item rather than objects of type Displayable. For example, objects of the following types are all objects of type Item (see Figure 1):
The purpose of this MIDlet is to illustrate the use of an ItemCommandListener on an item in a Form. The MIDlet creates a Form and populates it with the following Item objects:
Commands added to the Form
An EXIT Command and an associated CommandListener are added to the Form. The EXIT command is visible in the left soft key position during the entire period that the MIDlet is running (except when the Alert has taken over the screen).
Commands added to the ChoiceGroup
An ITEM Command and an associated ItemCommandListener are added to the ChoiceGroup. The label on the ITEM command is GetSelection. It is visible in the right soft key position only when the Form selector is on the ChoiceGroup.
Behavior of the EXIT and ITEM command listeners
When the EXIT command is activated, the MIDlet enters the destroyed state.
When the ITEM command is activated, an Alert is displayed on the screen. It contains the text and the image from the selected element in the ChoiceGroup item.
ChoiceGroup selected in Sun cell phone emulator
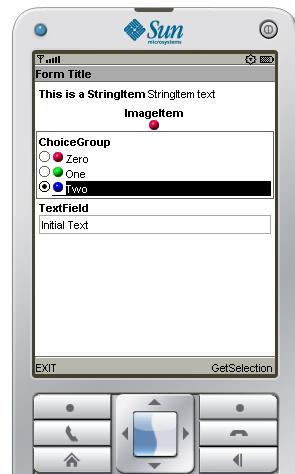
Figure 8 shows the MIDlet running in the Sun cell phone emulator with the ChoiceGroup having been selected by scrolling down using the arrow key.
Figure 8. ChoiceGroup selected in Sun cell phone emulator.
|
|
In addition to the ChoiceGroup having been selected, the third element within the ChoiceGroup has been selected.
One command in each soft key position
Note the EXIT command in the left soft key position and the GetSelection command in the right soft key position. The latter is actually an ITEM command with the label set to "GetSelection." This command appears only when the ChoiceGroup has been selected.
Screen output from activating the GetSelection command
Figure 9 shows the result of clicking the button immediately beneath the GetSelection command.
Figure 9. Result of activating the GetSelection command.
|
|
As you will see later, activating the GetSelection command causes an Alert to appear on the screen displaying the text and the image from the selected element within the ChoiceGroup item.
Commands disappear during the Alert
Note that neither the EXIT command nor the GetSelection command is visible while the Alert is on the screen. When the Alert relinquishes the screen, the Form selector reverts to the first item at the top of the screen and the GetSelection command is no longer visible.
Will discuss in fragments
A complete listing of this MIDlet is provided in Listing 19 near the end of the lesson. The beginning of the class and the beginning of the constructor is shown in Listing 12.
Listing 12. Beginning of the class for the MIDlet named Command05.
public class Command05 extends MIDlet{
  Image redBallImage;
  Image greenBallImage;
  Image blueBallImage;
  Form form;
  ChoiceGroup choiceGroup;
  MIDlet theMIDlet;
  //----------------------------------------------------//

  public Command05(){//constructor
    System.out.println("Construct MIDlet");

    //Save a reference to the MIDlet object as an
    // instance variable so that it will be available to
    // code inside the anonymous class.
    theMIDlet = this;

    try{
      //Make certain that the image files specified
      // below are in the same directory as the source
      // file.
      redBallImage = Image.createImage(
                                "/Command05/redball.PNG");
      greenBallImage = Image.createImage(
                              "/Command05/greenball.PNG");
      blueBallImage = Image.createImage(
                               "/Command05/blueball.PNG");
    }catch(Exception e){
      e.printStackTrace();
    }//end catch

    //Create Form
    form = new Form("Form Title");

    //Add an EXIT command to the form.
    form.addCommand(new Command("EXIT",Command.EXIT,2));

    //Set a commandListener object on the form.
    form.setCommandListener(
      new CommandListener(){
        public void commandAction(Command cmd,
                                  Displayable disp){
          if(cmd.getCommandType() == Command.EXIT){
            //Enter the destroyed state.
            destroyApp(true);
          }//end if
        }//end commandAction
      }//end new CommandListener
    );//end setCommandListener
|
Assuming that you have studied the earlier lessons in this series, there is nothing new in Listing 12. At the end of Listing 12, a Form has been created. An EXIT command and a CommandListener have been added to the Form. When the EXIT command is activated, the CommandListener calls the destroyApp method to cause the MIDlet to enter the destroyed state.
Append a StringItem and an ImageItem to the Form
Listing 13 appends the StringItem and ImageItem objects to the Form as shown at the top of Figure 8.
Listing 13. Append a StringItem and an ImageItem to the Form.
    //Create and append a StringItem to the form.
    StringItem stringItem = new StringItem(
                                   "This is a StringItem",
                                   "StringItem text\n");
    form.append(stringItem);


    //Create and append an ImageItem to the form..
    ImageItem imageItem = new ImageItem(
                                       "ImageItem",
                                       redBallImage,
                                       Item.LAYOUT_CENTER,
                                       "Alt Text");
    form.append(imageItem);
|
Once again, there is nothing new about the code in Listing 13 so it shouldn't require further explanation.
Append a ChoiceGroup object to the Form
Listing 14 creates a ChoiceGroup object and appends it to the Form as shown in Figure 8.
Listing 14. Append a ChoiceGroup object to the Form.
    choiceGroup = new ChoiceGroup("ChoiceGroup",
                                        Choice.EXCLUSIVE);
    choiceGroup.append("Zero",redBallImage);
    choiceGroup.append("One",greenBallImage);
    choiceGroup.append("Two",blueBallImage);
    form.append(choiceGroup);
|
Listing 14 sets the selection mode to EXCLUSIVE. This object will be referenced inside an anonymous class. Therefore, the reference to the ChoiceGroup object cannot be a local variable but must be an instance variable to make it accessible within the anonymous class. Once again, we haven't seen anything new yet. However, we will see something new in the next code fragment.
Add an ITEM command and an ItemCommandListener to the ChoiceGroup object
Listing 15 begins by adding a command of type Command.ITEM to the ChoiceGroup object. Note that the label that is placed on this command is "GetSelection." This is the text that appears on the screen to represent the command in the right soft key in Figure 8.
Listing 15. Add an ITEM command and an ItemCommandListener to the ChoiceGroup object.
    //Add an ITEM command to the choiceGroup item.
    choiceGroup.addCommand(new Command("GetSelection",
                                       Command.ITEM,
                                       2));

    //Set an ItemCommandListener object on the
    // choiceGroup object.
    choiceGroup.setItemCommandListener(
      new ItemCommandListener(){
        public void commandAction(Command cmd,
                                  Item item){
          if(cmd.getCommandType() == Command.ITEM){
            int idx = choiceGroup.getSelectedIndex();
            Display.getDisplay(theMIDlet).setCurrent(
                               new Alert("ITEM",
                               choiceGroup.getString(idx),
                               choiceGroup.getImage(idx),
                               AlertType.INFO));
          }//end if
        }//end commandAction
      }//end new CommandListener
    );//end setCommandListener
|
Set an ItemCommandListener on the ChoiceGroup
After adding the ITEM command to the ChoiceGroup object, Listing 15 sets an ItemCommandListener on the object.
The code in the commandAction method of the listener object will be executed whenever the ITEM command shown as GetSelection in Figure 8 is activated. When the commandAction method is called, it first checks to confirm that the command was actually an ITEM command. If so, it creates a new Alert object that displays the text and the image from the selected element in the ChoiceGroup object. That Alert takes over the display for the default time period as shown in Figure 9.
The remaining code in the MIDlet named Command05
There is nothing new in the remaining code in this MIDlet. You can view that code in Listing 19.
That's a wrap!
That wraps up the discussion on how to program MIDlets for interactive behavior. We've covered a lot of material in this lesson, so you may want to go back and review it one more time to make certain that you understand it completely.
I encourage you to copy the MIDlet code from Listings 16 through 19. Run the MIDlets in the updated MIDlet development framework named WTKFramework03 that I provided in the lesson titled Using Alerts, Images, Timers, and Gauges in MIDlets (see Resources).
Experiment with the MIDlet code, making changes and running your modified MIDlets in the framework program. See if you can explain the results produced by your changes.
Don't forget that you will need to download and install the latest version of the Sun Java Wireless Toolkit for CLDC (see Resources). As of the date this lesson is being written, the latest version of the toolkit is WTK2.5.2. In addition you will need three small image files to replace the red, green, and blue ball images in Figure 8.
I began by illustrating and explaining the addition of commands to a MIDlet and showing you how those commands are presented to the user in the Sun cell phone emulator.
Then I explained that interactive behavior of a MIDlet is achieved, not through commands, but rather through the use of a CommandListener or an ItemCommandListener. I illustrated and explained the setting and subsequent processing of a CommandListener in one of the simplest ways possible.
Following that, I presented and explained a much more substantive MIDlet. This MIDlet illustrates the use of CommandListener objects to handle seven of the eight possible types of commands and shows how to use commands to navigate through the different pages of a MIDlet that is composed of several pages.
Finally, I illustrated and explained the use of an ItemCommandListener to handle an ITEM command on an item contained in a Form.
In the next lesson, you will learn how to use methods of the Canvas class along with methods of the Graphics class to draw text and lines on the cell phone screen. You will learn how to use anchor point coordinates to control the position of text that is drawn on the screen. You will learn how to handle keyPressed events fired by a Canvas object.
Listing 16. Source code for the MIDlet named Command02.
/*Command02.java
Copyright 2007, R.G.Baldwin

The purpose of this MIDlet is to illustrate the addition
of commands to user interface components.

One of each of the allowable command types is added to a
TextBox object. No command listener is registered on the
TextBox, so activating a command has no effect on the
program. By using comment indicators to enable and disable
commands, it is possible to determine the manner in which
the Sun cell phone emulator allocates certain commands to
the left soft key, the right soft key, and a command menu.
Experimental results in this regard are included in the
comments.

The MIDlet displays the textBox and allows the user 100
seconds to experiment with the TextBox.  Then it enters
the destroyed state.

See the following URL for interesting comments on
the impact of a command priority relative to the
placement of the command on a soft key or in a command
menu.

http://books.google.com/books?id=fvR4W81VTFMC&pg=
PT108&lpg=PT108&dq=j2me+command+priority&source=web&ots=
ZAjS3g1FRN&sig=w2c0LN3iM2qPz7mVT5CybhUeuko#PPT108,M1

Tested using a Java SE 6 compiler, targeted at a V1.4
virtual machine, and WTK 2.5.2 running under Windows XP.
*********************************************************/

package Command02;

import javax.microedition.lcdui.Display;
import javax.microedition.midlet.MIDlet;
import javax.microedition.lcdui.TextField;
import javax.microedition.lcdui.TextBox;
import javax.microedition.lcdui.Command;

public class Command02 extends MIDlet{

  TextBox textBox;
  //----------------------------------------------------//

  public Command02(){//constructor
    System.out.println("Construct MIDlet");

    System.out.println("Create TextBox");
    textBox = new TextBox("TextBox Title",
                          "UNEDITABLE Text",
                          40,
                          TextField.UNEDITABLE);

    //Apparently the Sun cell phone emulator will only
    // place the following four commands on the left soft
    // key with the remaining commands being placed in a
    // command menu. The order of the statements indicates
    // the order of preference of the emulator for
    // selecting a command to be placed in the soft key.
    // For example, if the BACK command is added to the
    // component, it  will always be placed in the left
    // soft key. Note however that such placement is
    // independent of the order in which the commands are
    // added to the textBox. The following statements
    // were placed in this order simply to indicate the
    // order of preference of the emulator.
    //It also appears experimentally that when these
    // commands are relegated to the command menu, they
    // occupy the bottom positions in the menu in the same
    // order that they are listed here.
    textBox.addCommand(new Command("BACK",
                                    Command.BACK,3));
    textBox.addCommand(new Command("EXIT",
                                    Command.EXIT,2));
    textBox.addCommand(new Command("CANCEL",
                                   Command.CANCEL,3));
    textBox.addCommand(new Command("STOP",
                                   Command.STOP,1));


    //It appears experimentally that the following four
    // commands are never placed in the left soft key by
    // the Sun cell phone emulator but will always be
    // relegated to a command menu if more than one of
    // them are added to the textBox. Further, it
    // appears experimentally that they will be placed
    // in the menu in the order given below, but the order
    // in the menu is independent of the order in which
    // they are added to the textBox. If there is only
    // one command from the above group and one command
    // from the following group, the command from above
    // will be placed in the left soft key and the
    // command from below will be placed in the right soft
    // key.
    textBox.addCommand(new Command("ITEM",
                                   Command.ITEM,3));
    textBox.addCommand(new Command("SCREEN",
                                   Command.SCREEN,3));
    textBox.addCommand(new Command("OK",
                                   Command.OK,3));
    textBox.addCommand(new Command("HELP",
                                   Command.HELP,3));

  }//end constructor
  //----------------------------------------------------//

  public void startApp(){

    //Make the TextBox the current display.
    System.out.println("Display textBox");
    Display.getDisplay(this).setCurrent(textBox);

    //Sleep for 100 seconds.
    try{Thread.currentThread().sleep(100000);
    } catch(Exception e){}

    //Enter the destroyed state.
    this.destroyApp(true);
  }//end startApp
  //----------------------------------------------------//

  public void pauseApp(){
  }//end pauseApp
  //----------------------------------------------------//

  public void destroyApp(boolean unconditional){
    System.out.println("Destroy MIDlet");
    notifyDestroyed();
  }//end destroyApp
  //----------------------------------------------------//

}//end class Command02
|
Listing 17. Source code for the MIDlet named Command03.
/*Command03.java
Copyright 2007, R.G.Baldwin

The purpose of this MIDlet is to illustrate the setting
and subsequent processing of a CommandListener in one of
the simplest ways possible.

An EXIT command and a BACK command are added to a TextBox.

A CommandListener is set on the TextBox.

When either command is activated, the commandAction
method in the listener is called.  The incoming command
is tested to determine its type. If the type is BACK,
the command is simply ignored. If the type is EXIT, the
MIDlet enters the destroyed state.

An object of an anonymous class is used to implement the
CommandListener.

Tested using a Java SE 6 compiler, targeted at a V1.4
virtual machine, and WTK 2.5.2 running under Windows XP.
*********************************************************/

package Command03;

import javax.microedition.lcdui.Display;
import javax.microedition.midlet.MIDlet;
import javax.microedition.lcdui.TextField;
import javax.microedition.lcdui.TextBox;
import javax.microedition.lcdui.Command;
import javax.microedition.lcdui.CommandListener;
import javax.microedition.lcdui.Displayable;

public class Command03 extends MIDlet{

  TextBox textBox;
  //----------------------------------------------------//

  public Command03(){//constructor
    System.out.println("Construct MIDlet");

    System.out.println("Create TextBox");
    textBox = new TextBox("TextBox Title",
                          "UNEDITABLE Text",
                          40,
                          TextField.UNEDITABLE);

    //Add two commands to the textbox.
    textBox.addCommand(new Command("EXIT",
                                    Command.EXIT,2));
    textBox.addCommand(new Command("BACK",
                                    Command.BACK,2));

    //Set a commandListener object on the textBox.
    textBox.setCommandListener(
      new CommandListener(){
        public void commandAction(Command cmd,
                                  Displayable disp){
          System.out.println(cmd.getLabel());
          if(cmd.getCommandType() == Command.EXIT){
            //Enter the destroyed state.
            destroyApp(true);
          }else{
            //Ignore the BACK command
          }//end else
        }//end commandAction
      }//end new CommandListener
    );//end setCommandListener

  }//end constructor
  //----------------------------------------------------//

  public void startApp(){

    //Make the TextBox the current display.
    System.out.println("Display textBox");
    Display.getDisplay(this).setCurrent(textBox);
  }//end startApp
  //----------------------------------------------------//

  public void pauseApp(){
  }//end pauseApp
  //----------------------------------------------------//

  public void destroyApp(boolean unconditional){
    System.out.println("Destroy MIDlet");
    notifyDestroyed();
  }//end destroyApp
  //----------------------------------------------------//

}//end class Command03
|
Listing 18. Source code for the MIDlet named Command04.
/*Command04.java
Copyright 2007, R.G.Baldwin

The purpose of this MIDlet is to illustrate the handling
of seven of the eight available command types. The ITEM
command is not used in this MIDlet.

Three "pages" are created using TextBox objects. Commands
are added to the pages. CommandListener objects make it
possible to navigate through the pages and also to handle
the HELP, SCREEN, and STOP commands. Alert objects are
used to handle the HELP, SCREEN, and STOP commands

Tested using a Java SE 6 compiler, targeted at a V1.4
virtual machine, and WTK 2.5.2 running under Windows XP.
*********************************************************/

package Command04;

import javax.microedition.lcdui.Display;
import javax.microedition.midlet.MIDlet;
import javax.microedition.lcdui.TextField;
import javax.microedition.lcdui.TextBox;
import javax.microedition.lcdui.Command;
import javax.microedition.lcdui.CommandListener;
import javax.microedition.lcdui.Displayable;
import javax.microedition.lcdui.Alert;
import javax.microedition.lcdui.AlertType;

public class Command04 extends MIDlet{

  TextBox page1;
  TextBox page2;
  TextBox page3;
  MIDlet theMIDlet;
  //----------------------------------------------------//

  public Command04(){//constructor
    System.out.println("Construct MIDlet");
    theMIDlet = this;

    //Construct Page 1 and add five commands.
    page1 = new TextBox("Page 1",
                          "Page 1 Text",
                          40,
                          TextField.UNEDITABLE);

    page1.addCommand(new Command("EXIT",Command.EXIT,2));
    page1.addCommand(new Command("STOP",Command.STOP,2));
    page1.addCommand(new Command("SCREEN",
                                 Command.SCREEN,2));
    page1.addCommand(new Command("NEXT",Command.OK,2));
    page1.addCommand(new Command("HELP",Command.HELP,2));


    //Construct Page 2 and add seven commands.
    page2 = new TextBox("Page 2",
                          "Page 2 Text",
                          40,
                          TextField.UNEDITABLE);

    page2.addCommand(new Command("BACK",Command.BACK,2));
    page2.addCommand(new Command("EXIT",Command.EXIT,2));
    page2.addCommand(new Command("CANCEL",
                                 Command.CANCEL,2));
    page2.addCommand(new Command("STOP",Command.STOP,2));
    page2.addCommand(new Command("SCREEN",
                                  Command.SCREEN,2));
    page2.addCommand(new Command("NEXT",Command.OK,2));
    page2.addCommand(new Command("HELP",Command.HELP,2));


    //Construct Page 3 and add six commands.
    page3 = new TextBox("Page 3",
                          "Page 3 Text",
                          40,
                          TextField.UNEDITABLE);

    page3.addCommand(new Command("BACK",Command.BACK,2));
    page3.addCommand(new Command("EXIT",Command.EXIT,2));
    page3.addCommand(new Command("CANCEL",
                                 Command.CANCEL,2));
    page3.addCommand(new Command("STOP",Command.STOP,2));
    page3.addCommand(new Command("SCREEN",
                                 Command.SCREEN,2));
    page3.addCommand(new Command("HELP",Command.HELP,2));


    //Set a commandListener object on page1
    page1.setCommandListener(
      new CommandListener(){
        public void commandAction(Command cmd,
                                  Displayable disp){
          switch(cmd.getCommandType()){
            case Command.OK:
              //Advance to page2
              Display.getDisplay(theMIDlet).
                                        setCurrent(page2);
              break;
            case Command.HELP:
              Display.getDisplay(theMIDlet).setCurrent(
                  new Alert("HELP",
                  "A short saying often contains much "
                  + "wisdom.",
                  null,
                  AlertType.INFO));
              break;
            case Command.SCREEN:
              Display.getDisplay(theMIDlet).setCurrent(
                  new Alert("SCREEN",
                  "Processing Page 1",
                  null,
                  AlertType.INFO));
              break;
            case Command.EXIT:
              destroyApp(true);
              break;
            case Command.STOP:
              Display.getDisplay(theMIDlet).setCurrent(
                  new Alert("STOP",
                  "Nothing running to be stopped.",
                  null,
                  AlertType.ERROR));
              break;
            default:
              System.out.println("Should never get here");
          }//end switch
        }//end commandAction
      }//end new CommandListener
    );//end setCommandListener

    //Set a commandListener object on page2
    page2.setCommandListener(
      new CommandListener(){
        public void commandAction(Command cmd,
                                  Displayable disp){
          switch(cmd.getCommandType()){
            case Command.BACK:
              //Back to page1
              Display.getDisplay(theMIDlet).setCurrent(
                                                   page1);
              break;
            case Command.OK:
              //Advance to page3
              Display.getDisplay(theMIDlet).setCurrent(
                                                   page3);
              break;
            case Command.CANCEL:
              //Cancel back to page1
              Display.getDisplay(theMIDlet).setCurrent(
                                                   page1);
              break;
            case Command.HELP:
              Display.getDisplay(theMIDlet).setCurrent(
                  new Alert("HELP","Buy low, sell high",
                  null,
                  AlertType.INFO));
              break;
            case Command.SCREEN:
              Display.getDisplay(theMIDlet).setCurrent(
                  new Alert("SCREEN",
                  "Processing Page 2",
                  null,
                  AlertType.INFO));
              break;
            case Command.EXIT:
              destroyApp(true);
              break;
            case Command.STOP:
              Display.getDisplay(theMIDlet).setCurrent(
                  new Alert("STOP",
                  "Nothing running to be stopped.",
                  null,
                  AlertType.ERROR));
              break;
            default:
              System.out.println("Should never get here");
          }//end switch
        }//end commandAction
      }//end new CommandListener
    );//end setCommandListener

    //Set a commandListener object on page3
    page3.setCommandListener(
      new CommandListener(){
        public void commandAction(Command cmd,
                                  Displayable disp){
          switch(cmd.getCommandType()){
            case Command.BACK:
            //Back to page2.
              Display.getDisplay(theMIDlet).setCurrent(
                                                   page2);
              break;
            case Command.CANCEL:
            //Cancel back to page1
              Display.getDisplay(theMIDlet).setCurrent(
                                                   page1);
              break;
            case Command.HELP:
              Display.getDisplay(theMIDlet).setCurrent(
                  new Alert("HELP",
                  "Wisdom is the supreme part of "
                  + "happiness.",
                  null,
                  AlertType.INFO));
              break;
            case Command.SCREEN:
              Display.getDisplay(theMIDlet).setCurrent(
                  new Alert("SCREEN",
                  "Processing Page 3",
                  null,
                  AlertType.INFO));
              break;
            case Command.EXIT:
              destroyApp(true);
              break;
            case Command.STOP:
              Display.getDisplay(theMIDlet).setCurrent(
                  new Alert("STOP",
                  "Nothing running to be stopped.",
                  null,
                  AlertType.ERROR));
              break;
            default:
              System.out.println("Should never get here");
          }//end switch
        }//end commandAction
      }//end new CommandListener
    );//end setCommandListener

  }//end constructor
  //----------------------------------------------------//

  public void startApp(){

    //Make the TextBox the current display.
    Display.getDisplay(theMIDlet).setCurrent(page1);

  }//end startApp
  //----------------------------------------------------//

  public void pauseApp(){
  }//end pauseApp
  //----------------------------------------------------//

  public void destroyApp(boolean unconditional){
    System.out.println("Destroy MIDlet");
    notifyDestroyed();
  }//end destroyApp
  //----------------------------------------------------//

}//end class Command04
|
Listing 19. Source code for the MIDlet named Command05.
/*Command05.java
Copyright 2007, R.G.Baldwin

The purpose of this MIDlet is to illustrate the use of an
ItemCommandListener on an item in a Form.

The MIDlet creates a Form and populates it with the
following Item objects:

A StringItem.

An ImageItem.

A ChoiceGroup containing three elements each of which has
an image and a text part.

A TextField configured to allow for the entry of ANY text.

An EXIT command and an associated CommandListener are
added to the Form. The EXIT command is visible in the
left soft key position during the entire period that the
MIDlet is running.

An ITEM command and an associated ItemCommandListener are
added to the ChoiceGroup. The label on the ITEM command
is GetSelection. It is visible in the right soft key
position only when the Form selector is on the
ChoiceGroup.

When the EXIT command is activated, the MIDlet enters the
destroyed state.

When the ITEM command is activated, an Alert is displayed
on the screen. It contains the text and the image from the
selected element in the ChoiceGroup item.

Tested using a Java SE 6 compiler, targeted at a V1.4
virtual machine, and WTK 2.5.2 running under Windows XP.
*********************************************************/

package Command05;

import javax.microedition.lcdui.Display;
import javax.microedition.lcdui.Form;
import javax.microedition.midlet.MIDlet;
import javax.microedition.lcdui.Item;
import javax.microedition.lcdui.Image;
import javax.microedition.lcdui.ImageItem;
import javax.microedition.lcdui.Choice;
import javax.microedition.lcdui.ChoiceGroup;
import javax.microedition.lcdui.StringItem;
import javax.microedition.lcdui.TextField;
import javax.microedition.lcdui.Command;
import javax.microedition.lcdui.CommandListener;
import javax.microedition.lcdui.ItemCommandListener;
import javax.microedition.lcdui.Displayable;
import javax.microedition.lcdui.Alert;
import javax.microedition.lcdui.AlertType;

public class Command05 extends MIDlet{
  Image redBallImage;
  Image greenBallImage;
  Image blueBallImage;
  Form form;
  ChoiceGroup choiceGroup;
  MIDlet theMIDlet;
  //----------------------------------------------------//

  public Command05(){//constructor
    System.out.println("Construct MIDlet");

    //Save a reference to the MIDlet object as an
    // instance variable so that it will be available to
    // code inside the anonymous class.
    theMIDlet = this;

    try{
      //Make certain that the image files specified
      // below are in the same directory as the source
      // file.
      redBallImage = Image.createImage(
                                "/Command05/redball.PNG");
      greenBallImage = Image.createImage(
                              "/Command05/greenball.PNG");
      blueBallImage = Image.createImage(
                               "/Command05/blueball.PNG");
    }catch(Exception e){
      e.printStackTrace();
    }//end catch

    //Create Form
    form = new Form("Form Title");

    //Add an EXIT command to the form.
    form.addCommand(new Command("EXIT",Command.EXIT,2));

    //Set a commandListener object on the form.
    form.setCommandListener(
      new CommandListener(){
        public void commandAction(Command cmd,
                                  Displayable disp){
          if(cmd.getCommandType() == Command.EXIT){
            //Enter the destroyed state.
            destroyApp(true);
          }//end if
        }//end commandAction
      }//end new CommandListener
    );//end setCommandListener

    //Now populate the form.
    //Create and append a StringItem to the form.
    StringItem stringItem = new StringItem(
                                   "This is a StringItem",
                                   "StringItem text\n");
    form.append(stringItem);


    //Create and append an ImageItem to the form..
    ImageItem imageItem = new ImageItem(
                                       "ImageItem",
                                       redBallImage,
                                       Item.LAYOUT_CENTER,
                                       "Alt Text");
    form.append(imageItem);

    //Create a ChoiceGroup and append it to the Form.
    // This is like an embedded List. Set the
    // selection mode to EXCLUSIVE. The reference must be
    // an instance variable to make it accessible within
    // the anonymous class.
    choiceGroup = new ChoiceGroup("ChoiceGroup",
                                        Choice.EXCLUSIVE);
    choiceGroup.append("Zero",redBallImage);
    choiceGroup.append("One",greenBallImage);
    choiceGroup.append("Two",blueBallImage);
    form.append(choiceGroup);

    //Add an ITEM command to the choiceGroup item. Label
    // the command GetSelection.
    choiceGroup.addCommand(new Command("GetSelection",
                                       Command.ITEM,
                                       2));

    //Set an ItemCommandListener object on the
    // choiceGroup object.
    choiceGroup.setItemCommandListener(
      new ItemCommandListener(){
        public void commandAction(Command cmd,
                                  Item item){
          if(cmd.getCommandType() == Command.ITEM){
            int idx = choiceGroup.getSelectedIndex();
            Display.getDisplay(theMIDlet).setCurrent(
                               new Alert("ITEM",
                               choiceGroup.getString(idx),
                               choiceGroup.getImage(idx),
                               AlertType.INFO));
          }//end if
        }//end commandAction
      }//end new CommandListener
    );//end setCommandListener

    //Create a TextField and append it to the form.This
    // is similar to a TextBox embedded in a Form.
    TextField textField = new TextField("TextField",
                                        "Initial Text",
                                        30,
                                        TextField.ANY);
    form.append(textField);
  }//end constructor
  //----------------------------------------------------//

  public void startApp(){

    //Make the Form the current display.
    Display.getDisplay(this).setCurrent(form);

  }//end startApp
  //----------------------------------------------------//

  public void pauseApp(){
  }//end pauseApp
  //----------------------------------------------------//

  public void destroyApp(boolean unconditional){
    System.out.println("Destroy MIDlet");
    notifyDestroyed();
  }//end destroyApp
  //----------------------------------------------------//

}//end class Command05
|
Copyright 2008, Richard G. Baldwin. Reproduction in whole or in part in any form or medium without express written permission from Richard Baldwin is prohibited.
Richard has participated in numerous consulting projects and he frequently provides onsite training at the high-tech companies located in and around Austin, Texas. He is the author of Baldwin's Programming Tutorials, which have gained a worldwide following among experienced and aspiring programmers. He has also published articles in JavaPro magazine.
In addition to his programming expertise, Richard has many years of practical experience in Digital Signal Processing (DSP). His first job after he earned his Bachelor's degree was doing DSP in the Seismic Research Department of Texas Instruments. (TI is still a world leader in DSP.) In the following years, he applied his programming and DSP expertise to other interesting areas including sonar and underwater acoustics.
Richard holds an MSEE degree from Southern Methodist University and has many years of experience in the application of computer technology to real-world problems.
Keywords
java J2ME MIDlet "cell phone emulator" "wireless toolkit" WTK MIDP CLDC
Displayable TextBox Ticker TextField Alerts Images Timers Gauges Lists Forms
Items String StringItem ImageItem ChoiceGroup DateField Command CommandListener
ItemCommandListener
-end-