

| << Chapter < Page | Chapter >> Page > |
To begin with, Image 1 shows a reduced screen shot of the online programming interface in the browser window. Note that the source code inthe rightmost panel was reduced in size to help it fit into this presentation format. The stage was also switched to the small format by clicking the littletriangle immediately below the stage.
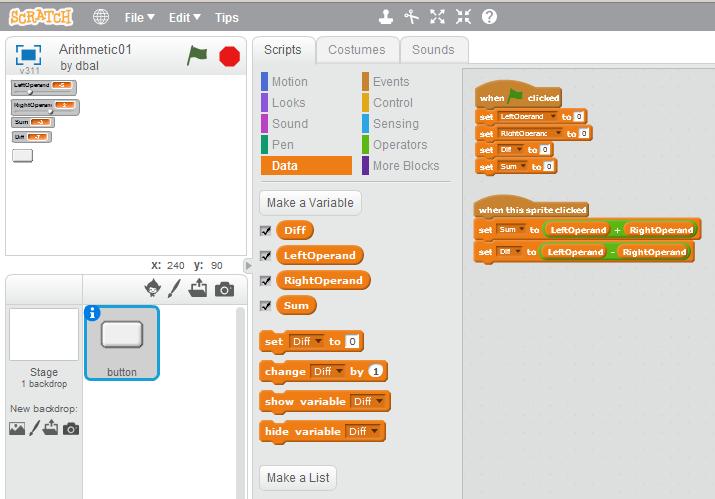
Image 1 lacks detail due to the requirement to reduce the size of the image for publication in this format, but there are someaspects of Image 1 that can be seen.
The center panel (and the stage) shows that four variables have been created. In caseyou can't read the names of those variables, I will list them here:
You can probably see that the checkbox next to each variable has been checked. As you learned in an earlier module, checking this box causes thevariable to be displayed in the Stage area on the upper left. Thus you can see all four variables being displayed in the upper left corner of theStage.
Skipping to the area immediately below the Stage, you can see that a button spritehas been added to the program. That button has been selected in Image 1 , making it possible to drag blocks from the toolboxes into the rightmost panel to control thebehavior of the button.
Although you probably can't read the details in Image 1 , you can see that there are two scripts showing in the rightmost panel. (I will show you an expanded screen shot of the rightmost panel later in Image 2 .)
For now, suffice it to say that the top script initializes the values stored in all four variables when theuser clicks the green flag in the upper right of the stage in Image 1 . The bottom script in the rightmost panel defines the behavior of the program when the userclicks the button in the Stage area.
If you look carefully, you can tell that the top two variables that are displayed in the Stage area look different from the bottom two variables.This is because a slider has been assigned to each of the top two variables (see Image 5 ) . This makes it possible for the user to manually set the values stored in each of these two variables by moving the thumb or pointer onthe slider.
To create a slider for a variable, right click on the display of the variable in the Stage area and select slider in the popup menu that appears.
Once you have caused a slider to appear with the variable display, you can right-click on the variable display again and select set slider min and max in the popup menu to specify the range of the slider. This will cause asimple dialog box to appear into which you can enter the minimum value and the maximum value and then click an OK button. In this program, I have bothsliders set to a minimum value of -10 and a maximum value of +10.
Image 2 shows an expanded view of the rightmost panel after having selected the button icon in the area immediately below the Stage in Image 1 .
Notification Switch
Would you like to follow the 'Teaching beginners to code' conversation and receive update notifications?

|
|

|
|

|
|

|
|
|
|
|

|
|

|
|

|
|
|
|

|