

| << Chapter < Page | Chapter >> Page > |
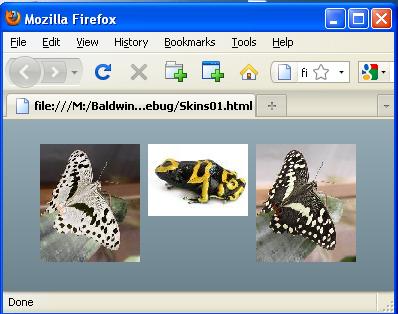
Figure 5 shows the result of allowing the mouse pointer to hover over the leftmost button.

Hovering over the button with the mouse pointer causes the button to switch to the overSkin style exposing the top image in the second column in Figure 1.
Note that the rightmost button has been toggled from frog skins to butterfly skins in Figure 5.
Mouse pointer pressed on the leftmost button
Figure 6 shows the result of pointing to the leftmost button and pressing the left mouse button.
This causes the button to switch to the downSkin style exposing the top image in the third column in Figure 1.
Skins01 project file structure
Figure 7 shows the project file structure for the Flex project named Skins01.
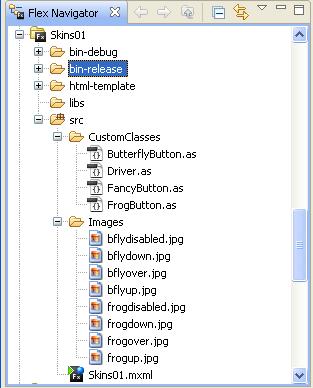
The image in Figure 7 was captured from the Flex Navigator panel in the Flex Builder 3 IDE.
Eight images
The eight images shown in Figure 1 are listed in the Images folder in Figure 7.
Three custom button classes
The three custom button classes and the driver class illustrated by Figure 2 through Figure 6 are listed in the CustomClasses folder in Figure 7.
The MXML application file
And of course, the Flex MXML file is shown as Skins01.mxml in Figure 7.
Custom button classes are very similar
The three custom button classes are very similar. The class named FancyButton is the most complex of the three. Therefore, I will explain the class named FancyButton in detail but I won't explain the other two custom button classes.
In addition, I will explain the MXML file named Skins01.mxml and the class file named Driver.as .
Will explain in fragments
I will explain the code in fragments. Complete listings of all of the source code files are provided in Listing 8 through Listing 12 near the end ofthe lesson.
A complete listing of this file is shown in Listing 1. In addition, a complete listing is also provided in Listing 8 near the end of the lesson alongwith the code for all of the other files in this application.
<?xml version="1.0" encoding="utf-8"?><mx:Application
  xmlns:mx="http://www.adobe.com/2006/mxml"xmlns:cc="CustomClasses.*"><cc:Driver/></mx:Application>
The code in Listing 1 couldn't be simpler. It declares a namespace for the folder containing the four class files in Figure 7 and instantiates anobject of the class named Driver . In this case, the Flex application is simply serving as a launch pad for the ActionScript program.
The class named Driver begins in Listing 2. A complete listing of this class file is provided in Listing 9 near the end of the lesson.
package CustomClasses{
  import flash.events.*;import mx.containers.HBox;public class Driver extends HBox{private var bFlyButton:ButterflyButton =
                                   new ButterflyButton();private var frogButton:FrogButton = new FrogButton();
private var fancyButton:FancyButton =new FancyButton(); Notification Switch
Would you like to follow the 'Object-oriented programming (oop) with actionscript' conversation and receive update notifications?

|
|

|
|

|
|

|
|

|
|

|
|

|
|

|
|

|
|

|