

| << Chapter < Page | Chapter >> Page > |
The end of the darkenBackground method
Listing 7 signals the end of the processing loop and the end of the darkenBackground method.
Apply a red tint to the skater
Returning to where we left off in the run method in Listing 4 , the code in Listing 8 calls a method named redTint , passing a reference to the picture that contains a cropped image of the skater. The method applies a red tint to theskater.
| Listing 8 - Apply a red tint to the skater. |
|---|
redTint(skater); |
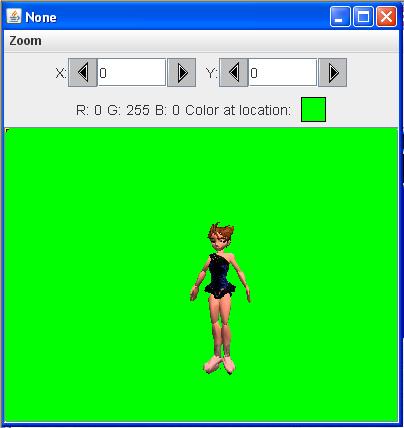
The redTint method assumes that the image being processed has a pure green background like that shown in Figure 1 . The method applies an algorithm very similar to that shown in Listing 7 to apply a red tint to every pixel that is not pure green.
Because of the similarity of the code in the redTint method and the code in Listing 7 , a detailed explanation of the redTint method should not be required. You can view the method in its entirety in Listing 10 near the end of the module.
The skater with the red tint applied
If you were to display the picture referred to by skater immediately after the redTint method returns in Listing 8 , you would see the image shown in Figure 7 .
Figure 7 - The skater with a red tint applied.
Compare Figure 7 with Figure 1
You can see the effect of applying the red tint process to the skater by comparing Figure 7 with Figure 1 . Note that the process does not change the color of the green pixels.
The remainder of the run method
Continuing with the run method, Listing 9 calls a method named greenScreenDraw to draw the cropped, red-tinted skater on the snow scene as shown in Figure 4 .
| Listing 9 - The remainder of the run method. |
|---|
//Draw the skater on the snowScene.
    greenScreenDraw(skater,snowScene,0,0);//Display students name on the final output and
    // display it.snowScene.addMessage("Display your name here.",10,15);

    snowScene.explore();System.out.println(snowScene);

}//end run method |
Behavior of the method
The greenScreenDraw method copies all non-green pixels from a source image to a destination image at a specified location. This method is verysimilar to methods that I have explained in earlier modules. Therefore, an explanation of the method in this module should not be needed.
You can view the greenScreenDraw method in its entirety in Listing 10 near the end of the module.
Add text and display the final output image
When the greenScreenDraw method returns, Listing 9 calls the addMessage method to display the student's name on the snow scene and then calls the explore method to produce the output image shown in Figure 4 . None of that should be new to you at this point.
Display text and return
Finally, Listing 9 displays some information on the command line screen as shown in Figure 5 and returns control to the main method in Listing 1 .
Terminate the program
Having nothing more to do, the main method terminates, causing the program to terminate and return control to the operating system.
I encourage you to copy the code from Listing 10 . Compile the code and execute it. Experiment with the code, making changes, and observing the resultsof your changes. Make certain that you can explain why your changes behave as they do.
Notification Switch
Would you like to follow the 'Object-oriented programming (oop) with java' conversation and receive update notifications?

|
|

|
|

|
|

|
|

|
|

|
|

|
|
|
|
|

|
|

|