

| << Chapter < Page | Chapter >> Page > |
a) A STEEP SLOPE AND A GRADUAL SLOPE

In the case of a gradual slope, the contour lines are far apart.
In the case of a steep slope, the contour lines are closer to one another.
b) A CONVEX AND CONCAVE SLOPE

c) A FLAT-TOPPED MOUNTAIN (MESA)
A large, flat, table-like top is distinguishable.

d) A FLAT-TOPPED HILL (BUTTE) AND POINTED HILLS

Pointed hill

Flat-topped hill
In the case of pointed hills, the contours are nearly circular and at equal distances from one another. The contours with the highest height values are in the middle.
In the case of a flat-topped hill, the inner two or three contours will be close together. The innermost contour has the highest value, but encloses a larger, oval area (the table).
e) A CLIFF OR WATERFALL

Where two or three contour lines lie together, a perpendicular cliff is indicated. This occurs in mountainous regions.
When a river is precipitated over such a cliff, a waterfall is created.
f) MOUNTAIN RANGES

The highest contour values in mountain ranges are also in the middle of the pattern of contours, but high peaks will have separate points. Rivers could occur here.
g) A POORT AND NECK
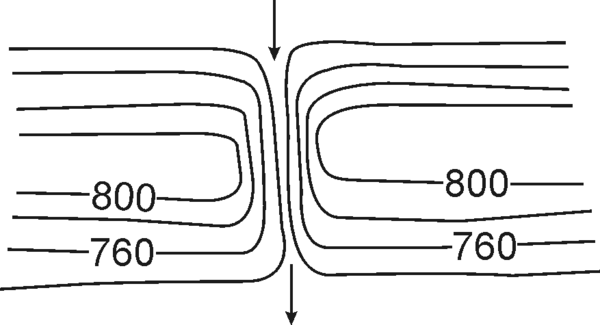
Poort
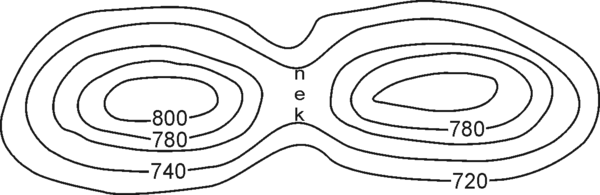
Neck
When a river runs through a narrow opening in a mountain range, such an opening is referred to as a poort. The cliffs/precipices are very steep, so contours are close together on the map.
A neck occurs where a lower point that is still much higher than the surrounding area occurs between two hills.
h) A RIVER VALLEY AND A SPUR

A spur is formed between two river valleys.
In the case of a river valley, the greatest height is to the outer side and the land sinks down towards the inner side, where the riverbed is.
In the case of a spur, the greatest height is to the inner side and the land sinks down towards the outer side of the spur.
All of the above landforms will not occur on all topographic maps, but many of them will occur on such maps. Practising to read topographic maps will enable the map-reader to recognise these features easily.
ACTIVITY:
[LO 1.4]
1. Build a model to represent contours.

a) Copy the various contours by means of tracing paper.
b) Collect cardboard boxes and cut each of the shapes formed by the individual contours from the cardboard.
c) Start by cutting out the shape formed by the lowest contour (400 m) and repeat the cutting out for each of the contours.
d) Arrange the cardboard sheets representing contour areas as in the figure and paste them together.
| Learning Outcomes(LOs) |
| LO 1 |
| Geographical EnquiryThe learner will be able to use enquiry skills to investigate geographical and environmental concepts and processes. |
| Assessment Standards(ASs) |
| We know this when the learner: |
|
|
|
|
ACTIVITY:
Notification Switch
Would you like to follow the 'Geography grade 8' conversation and receive update notifications?

|
|

|
|

|
|

|
|
|
|

|
|
|
|
|

|
|

|
|

|